

Before we start clustering, I prepared 3 hosts with 2 NICs (first for management, second for cluster communication only) and 2 SATA disks each.
Note: If you plan to build a test environment inside VMware VMs, then you may get the following error from Cluster Validation Wizard:
Disk partition style is GPT. Disk has a Microsoft Reserved Partition. Disk type is BASIC. The required inquiry data (SCSI page 83h VPD descriptor) was reported as not being supported.
To avoid this, you can add SATA disks instead SCSI. When using SATA disks, please configure a different controller ID for different disks across all nodes. The base on controller ID disks will get serial numbers, and it’s possible that different disks from different nodes will have the same serial number. This will cause problems for S2D.
The following configuration is made from an external computer I used for management. To be able to perform configuration remotely (by Invoke-Command or by CimSession parameter), I added all the required PowerShell modules for Hyper-V and Failover Clustering to my management machine.
So, let’s start with cluster validation.
Test-Cluster -Node nano_srv1, nano_srv2, nano_srv3 -Include "Storage Spaces Direct", Inventory, Networking, "System Configuration"I got a warning regarding the SCSI 83h VPD descriptor we mentioned earlier. We can ignore this warning since this is a system disk for Nano server, which will not be part of Storage Spaces Direct.

Now we will create a new cluster with three nodes.
New-Cluster -Name "nanocluster" -Node nano_srv1, nano_srv2, nano_srv3 -NoStorage -StaticAddress 10.11.0.40The NoStorage parameter is to skip cluster storage configuration. We will setup Storage Spaces Direct later. I received a warning here relating to a missing witness.

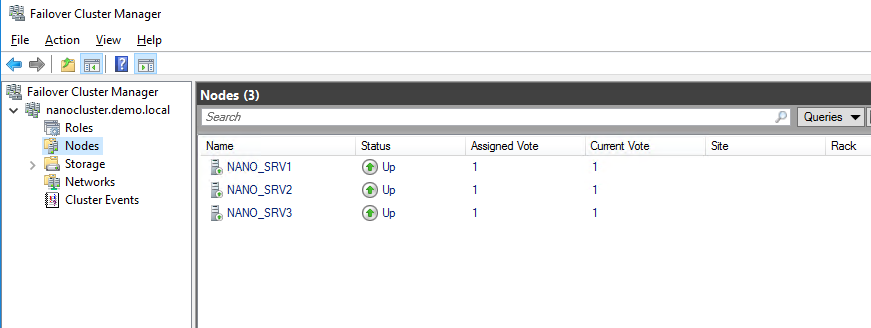
Yes, only two commands are required for cluster creation. We can check it in Failover Cluster Manager.
Now some network cosmetics. I’ll change the cluster networks name for easier identification.
Get-ClusterNetwork -Cluster nanocluster
(Get-ClusterNetwork -Cluster nanocluster | Where-Object {$_.Address -eq "10.11.0.0"}).Name = "Management_Network"
(Get-ClusterNetwork -Cluster nanocluster | Where-Object {$_.Address -eq "10.11.1.0"}).Name = "Cluster_Network"
Get-ClusterNetwork -Cluster nanocluster
Before we take care of storage, let's configure the cluster quorum. I’ll use the node majority here.
Set-Clusterquorum -Cluster nanocluster -NoWitness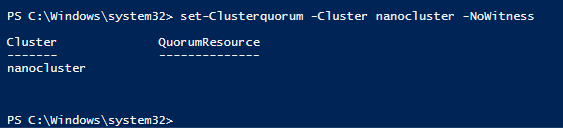
Now we will create Storage Spaces Direct (S2D). S2D can have from 2 up to 16 nodes. It will offer local server disks (SATA, SAS, NVMe) to be visible across the whole cluster. In my environment, I have three nodes, two disks each available for pooling. I can verify if I can see all of them by:
$nodes = @("nano_srv1","nano_srv2","nano_srv3")
0..2 | foreach { Get-PhysicalDisk -CanPool $true -CimSession $nodes[$_] }
The first command is to create an array with all my nodes. I’ll use it to execute commands on specific hosts (0,1 or 2). The second command is to get all disks that can be pooled from all nodes. The CanPool parameter means that disks can be used in storage pool — we will use it in S2D.

So, let's enable S2D.
Enable-ClusterStorageSpacesDirect -CimSession $nodes[0]All the disks I have are SSD, so no disk was chosen for a cache.

Now, we can create a storage pool from all disks available for pooling. I also chose default settings for provisioning disk type and resiliency. The second command is for creating a new disk base on the new storage pool. It will have the maximum size and a cluster-shared volume version of ReFS.
New-StoragePool -StorageSubSystemName *Cluster* -FriendlyName NanoS2D -ProvisioningTypeDefault Fixed -ResiliencySettingNameDefault Parity -Physicaldisks (Get-PhysicalDisk -CanPool $true -CimSession $nodes[0]) -CimSession $nodes[0]
New-Volume -StoragePoolFriendlyName *S2D* -FriendlyName vDisk -FileSystem CSVFS_ReFS -UseMaximumSize -CimSession $nodes[0] 
Now we have a few options for VM storage. We can use:
- CSV - Volume(s) located in c:\ClusterStorage. If you choose this option, you can create few smaller volumes instead of one big volume(as above), and balance volume ownerships among all cluster nodes.
- Scale-Out File Server (SOFS) – I’ll choose this option.
We will create Scale-Out File Server role for hosting VMs here.
New-StorageFileServer -StorageSubSystemName *Cluster* -FriendlyName NanoSOFS -HostNames NanoSOFS -Protocols SMB -CimSession $nodes[0] 
SOFS role is created, but there still isn’t a share for VMs.

So, we will create one. The first command is to create a dedicated folder for VMs on our SOFS volume.
Second, is for SMB share creation. The share will be located on a previously created folder. We are also giving Full Access rights for all cluster nodes.
The last command sets the ACL for the file system folder to match the ACL used by an SMB share.
Invoke-Command -ComputerName nano_srv1 -ScriptBlock {md c:\ClusterStorage\Volume1\VMs}
New-SmbShare -Name VMs -Path c:\ClusterStorage\Volume1\VMs -FullAccess nano_srv1$, nano_srv2$, nano_srv3$, "domain admins", nanocluster$, "domain Computers" -CimSession $nodes[0]
Invoke-Command -ComputerName nano_srv1 -ScriptBlock {Set-SmbPathAcl -ShareName VMs}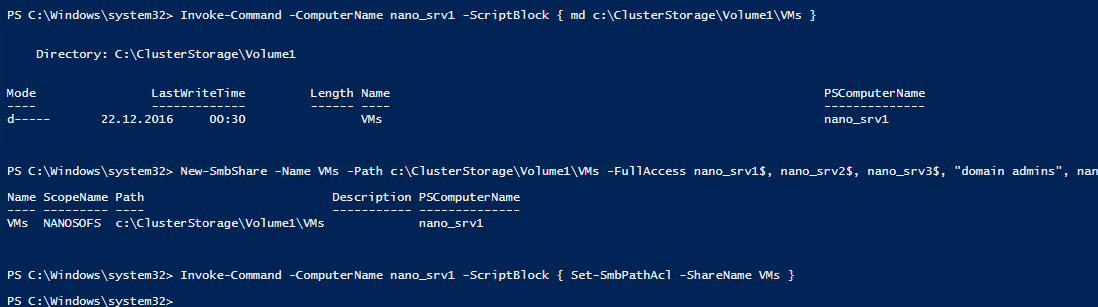
We can check the result in Failover Cluster Manager. Make sure the share is ready, and continuous Availability is enabled.

In our case, we have Hyper-V using SMB storage. To avoid access denied errors during VMs creation or VMs migrations, we should configure SMB Constrained Delegation. We can set it up in Active Directory Users and Computers for computer account properties (Delegation tab) or by PowerShell.
First, we must add an Active Directory PowerShell module. Then enable SMB delegation for each node. I added a machine from which all commands are executed.
Install-WindowsFeature RSAT-AD-PowerShell
Enable-SmbDelegation -SmbServer nanosofs -SmbClient nano_srv1
Enable-SmbDelegation -SmbServer nanosofs -SmbClient nano_srv2
Enable-SmbDelegation -SmbServer nanosofs -SmbClient nano_srv3
Enable-SmbDelegation -SmbServer nanosofs -SmbClient vbr
Enable-SmbDelegation -SmbServer nanosofs -SmbClient nanocluster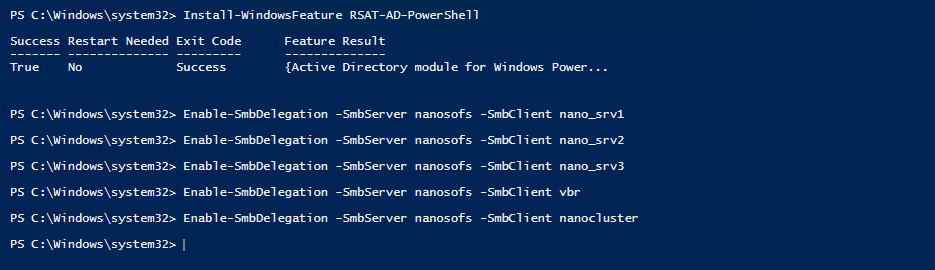
The cluster is ready, and now we can create VMs. With the same command, as in previous part of this blog series. The second command will cluster VMs from the first part.
New-VM -Name testVM3 -MemoryStartupBytes 1GB -Generation 2 -Path "\\nanosofs\VMs\" -NewVHDPath "\\nanosofs\VMs\testVM3\Virtual Hard Disks\testVM3.vhdx" -NewVHDSizeBytes 30GB -CimSession $nodes[1]
Add-ClusterVirtualMachineRole -Cluster nanocluster -VMName testVM3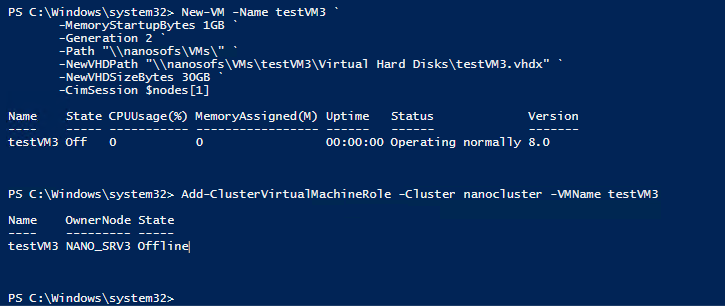
Done. Now we have a fully working clustered Hyper-V environment with the Storage Spaces Direct.
If we have a lack of resources, we can add more nodes with the following commands. The first and last command is to check cluster members. The second command is to add an additional node.
Get-ClusterNode -Cluster nanocluster
Add-ClusterNode -Cluster nanocluster -Name nano_srv4
Get-ClusterNode -Cluster nanocluster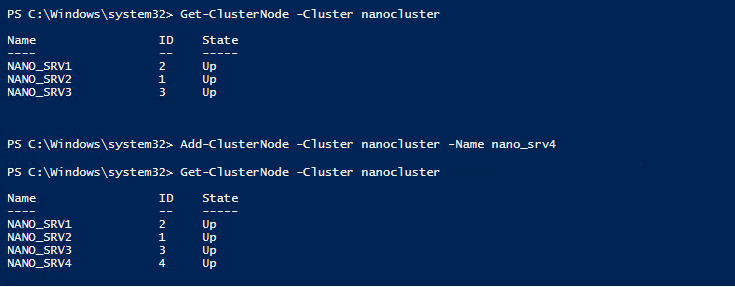
Now we have four nodes. Disks from the new node are visible to the whole cluster. We can create a new storage pool or add disks to our current storage pool. We can do this by:
$PDToAdd = Get-PhysicalDisk -CanPool $True -CimSession $nodes[0]
Add-PhysicalDisk -StoragePoolFriendlyName NanoS2D -PhysicalDisks $PDToAdd -CimSession $nodes[0]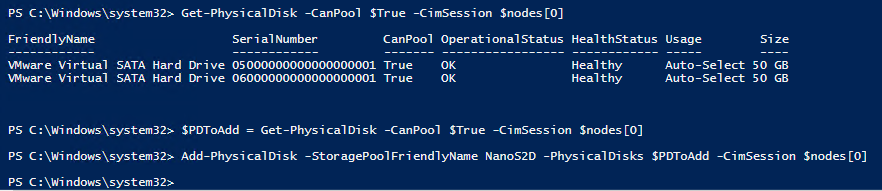
At this moment, we have new disks in the pool, and we can extend our virtual disk. In GUI, we can specify new disk size or use the available maximum size while also taking in account that it’s in parity mode.
With PowerShell, we should calculate maximum available size by the first command. It will get (Get-VirtualDiskSupportedSize) the available size of new disks in parity mode, and add to current disk size (Get-VirtualDisk). The result is in bytes.
The second command is to resize our disk.
$maxsize = ((Get-StoragePool nanos2d -CimSession $nodes[0]| Get-VirtualDiskSupportedSize -ResiliencySettingName Parity).VirtualDiskSizeMax + (Get-StoragePool nanos2d -CimSession $nodes[0]| Get-VirtualDisk).Size)
Resize-VirtualDisk -FriendlyName vDisk -Size $maxsize -CimSession $nodes[0]
That concludes our Nano Server deployment series — we went all the way from creating an image through deploying, configuring, clustering and adding a new node. Hope you enjoyed the ride and we'll see you next time!
Want to learn everything about Nano Server? Access the following free resources:
Have a question about something in this article? You can receive help directly from the article author. Sign up for a free trial to get started.
Comments (0)