Lessons Learned: Adding Used NVME Drive to HP ProLiant Server with ESXi


I have over 30 years in the IT industry. During this time I have worked with a variety of products in a variety of industries.
Published:
Browse All Articles > Lessons Learned: Adding Used NVME Drive to HP ProLiant Server with ESXi
Installing used hardware in a home lab or other systems can have some challenges. Hopefully, the lesson learned here with a used NVMe drive will save someone else time and headache.
I have always advocated for technology professionals to run home labs. This is a great way to work and learn a variety of new technologies. My lab consists of a number of used Dell and HP ProLiant servers. I have used the Dell servers primarily for Windows installs like my domain controller and Hyper-V lab. The HP ProLiant servers are used for my VMware\ESXi environment. As VMware Cloud Foundation has become the primary product I work with in my normal day-to-day job, I set out to create a host to be able to deploy an entire VMware Cloud Foundation environment via the Holodeck Toolkit 2.0. If interested, the toolkit can be found here: VMware Holodeck Toolkit 2.0
Part of the requirements for this deployment are 2TB SSD disks. With this in mind, I set out looking on eBay for a suitable disk. Ensuring the interface and requirements were met for the HP servers in my lab. I found an Intel DC P4500 SSD NVMe drive that I felt was suitable and would meet the needs for my lab. However, this assumption was incorrect.
When the drive arrived a few days later, I installed it in a drive tray and inserted it in the server. The indicator on the front of the drive just kept spinning. Logging into the HP Array Utility showed that the server did not see the new drive at all. That particular slot showed as empty. The seller was highly rated, so I felt the odds of a bad part were not likely and that maybe the server needed a firmware update to be able to use the NVMe drive. However, this was not the case either. What I found out in researching was that the HP array controller would not work for a NVMe drive. However, there was a kit available that would replace the from DVD drive with a two slot bay and a NVME controller for one of the PCI slots. The problem is that even used, this kit was over $900. There seemed to be others that had ran into a similar problem. Fortunately, one person had posted about using a StarTech PCIe NVMe adapter in their HP ProLiant server without issue. My next step was to order one of these adapters.
When the adapter arrived, I powered off the server, attached the NVMe drive to the new controller and inserted it in the PCIe slot. Once all of the cables were reattached, I powered it up and waited for ESXi to boot. When I went to create a data store, I still showed no available disk as shown below.

This lead me down the path to verifying the Intel NVMe drive was on the VMware HCL and if I needed to manually install additional drivers. The VMware compatibility tool indicated that this drive was supported with “in box” drivers on version 8U2 (the installed version). Even checking the Intel site did not list any updated drivers for ESXi 8. This meant that natively, ESXi should recognize the drive without an additional update to the operating system. At this point, I am unsure if the issue is a bad drive, the server not recognizing it, or an unexpected issue with ESXi. With the card installed in a PCIe slot, it did not seem to appear anywhere during the system POST. Since the server had an iLO installed, I decided to check the hardware inventory. While it did not show up as a storage device, it did appear under the “Device Inventory” tab as shown below.

This indicated the hardware recognized the device was installed in the server itself. Now, it seemed the issue was between the drive and ESXi. In searching for a solution, I came to a post on Reddit. While it did not provide a total solution, on a post with a similar issue, someone asked if the drive already had a GPT or other partition on it. Suddenly, it was like a lightning bolt struck. Being paranoid and always wiping drives, it never dawned on me that the drive shipped with an existing partition on it. Of course, ESXi could not create a VMFS datastore if it appears there was an existing partition.
Rather than trying to pull the drive and install it in another system, it seemed easier to look up ESXCLI commands for detecting and formatting the drive. The following command can be used to check if ESXi sees any NVME devices:

Figuring there was already data and a partition on the drive, the following command shows if data is already on the drive (note the drive name vmhba2 was placed in the command from the previous output):
Since formatting the wrong device can be an issue, there is also an ESXCLI command to verity the model and serial number of the drive:
Having validated the hardware and operating system recognizes the new NVMe drive and that it is the correct model and serial number, it does seem that an existing partition has been the issue since installing it with the NVMe adapter. Now, the drive can be formatted to see if then a datastore can be added within ESXi. Researching led me to a Western Digital blog on formatting NVMe drives. While the above commands had some from other sources, they are also located on this blog site: Formatting NVMe Drives for ESXi
Now, to walk through the formatting of the NVMe drive. There is a specific LBAF format the drive may support, this can be obtained from the following command:

From this output, the “Format ID: 0” indicates the LBAF=0. Now, the device will be formatted using the following command:

Now, to test if this resolved the issue, time to try to add a new datastore using the NVMe drive. The process for this is as follows:
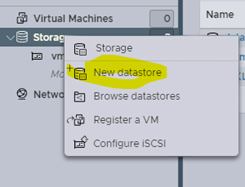
1. Under “Storage”, right click and select “New datastore”
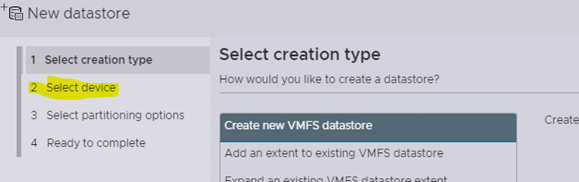
 2. Select “Create new VMFS datastore".
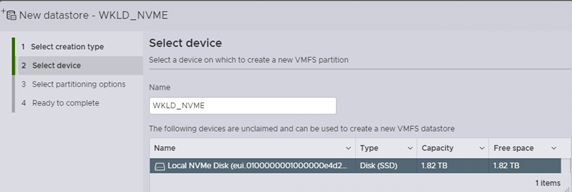
3. Select a device (notice the NVMe disk is now available). Provide a name and select "Next". In this case, it will be used for a VCF workload domain. So, the name reflects its use.
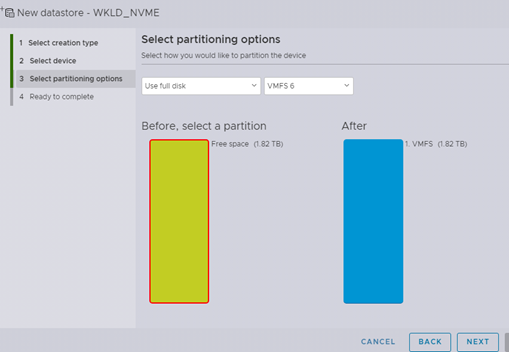
 4. Select a partitioning option (usually use the total space and the latest VMFS), then click “Next”.
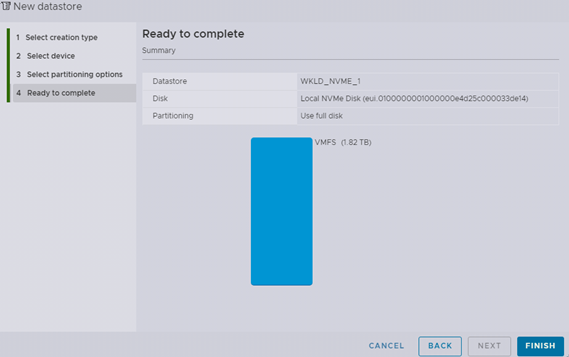
5. Validate, the select “Finish”
Once the host finishes configuring the drive as a new datastore, it will appear under the storage listings. The storage is now ready for use in your environment.

Conclusion
While this is not an issue that one may commonly come across, it can still cause a lost of time in troubleshooting and testing. It is a common practice in home labs to purchase and install used hardware. There are a few organizations that may also do the same to save cost. Due to privacy and security concerns, it is always best practice to securely wipe drives before reselling or disposing of them. This process should leave the drives without a partition and fully recognizable by the operating system. However, not everyone follows these processes. In addition, when upgrading and modifying systems, it is best to check all aspects of compatibility. In this case, the assumption was made that since the drive had the correct interface and was an SSD, it should work without issue. There was no thought given to the fact that the array controller would not recognize NVMe. This shows the detail needed in analyzing parts as lack of compatibility is typically not a valid reason for a return\refund when purchasing used hardware.
Part of the requirements for this deployment are 2TB SSD disks. With this in mind, I set out looking on eBay for a suitable disk. Ensuring the interface and requirements were met for the HP servers in my lab. I found an Intel DC P4500 SSD NVMe drive that I felt was suitable and would meet the needs for my lab. However, this assumption was incorrect.
When the drive arrived a few days later, I installed it in a drive tray and inserted it in the server. The indicator on the front of the drive just kept spinning. Logging into the HP Array Utility showed that the server did not see the new drive at all. That particular slot showed as empty. The seller was highly rated, so I felt the odds of a bad part were not likely and that maybe the server needed a firmware update to be able to use the NVMe drive. However, this was not the case either. What I found out in researching was that the HP array controller would not work for a NVMe drive. However, there was a kit available that would replace the from DVD drive with a two slot bay and a NVME controller for one of the PCI slots. The problem is that even used, this kit was over $900. There seemed to be others that had ran into a similar problem. Fortunately, one person had posted about using a StarTech PCIe NVMe adapter in their HP ProLiant server without issue. My next step was to order one of these adapters.
When the adapter arrived, I powered off the server, attached the NVMe drive to the new controller and inserted it in the PCIe slot. Once all of the cables were reattached, I powered it up and waited for ESXi to boot. When I went to create a data store, I still showed no available disk as shown below.
This lead me down the path to verifying the Intel NVMe drive was on the VMware HCL and if I needed to manually install additional drivers. The VMware compatibility tool indicated that this drive was supported with “in box” drivers on version 8U2 (the installed version). Even checking the Intel site did not list any updated drivers for ESXi 8. This meant that natively, ESXi should recognize the drive without an additional update to the operating system. At this point, I am unsure if the issue is a bad drive, the server not recognizing it, or an unexpected issue with ESXi. With the card installed in a PCIe slot, it did not seem to appear anywhere during the system POST. Since the server had an iLO installed, I decided to check the hardware inventory. While it did not show up as a storage device, it did appear under the “Device Inventory” tab as shown below.
This indicated the hardware recognized the device was installed in the server itself. Now, it seemed the issue was between the drive and ESXi. In searching for a solution, I came to a post on Reddit. While it did not provide a total solution, on a post with a similar issue, someone asked if the drive already had a GPT or other partition on it. Suddenly, it was like a lightning bolt struck. Being paranoid and always wiping drives, it never dawned on me that the drive shipped with an existing partition on it. Of course, ESXi could not create a VMFS datastore if it appears there was an existing partition.
Rather than trying to pull the drive and install it in another system, it seemed easier to look up ESXCLI commands for detecting and formatting the drive. The following command can be used to check if ESXi sees any NVME devices:
esxcli nvme device listFiguring there was already data and a partition on the drive, the following command shows if data is already on the drive (note the drive name vmhba2 was placed in the command from the previous output):
esxcli nvme device log smart get -A vmhba2 |grep WrittenSince formatting the wrong device can be an issue, there is also an ESXCLI command to verity the model and serial number of the drive:
esxcli nvme device get -A vmhba2 | egrep "Model|Serial"Having validated the hardware and operating system recognizes the new NVMe drive and that it is the correct model and serial number, it does seem that an existing partition has been the issue since installing it with the NVMe adapter. Now, the drive can be formatted to see if then a datastore can be added within ESXi. Researching led me to a Western Digital blog on formatting NVMe drives. While the above commands had some from other sources, they are also located on this blog site: Formatting NVMe Drives for ESXi
Now, to walk through the formatting of the NVMe drive. There is a specific LBAF format the drive may support, this can be obtained from the following command:
esxcli nvme device namespace get -A vmhba2 -n 1 | tail -30 From this output, the “Format ID: 0” indicates the LBAF=0. Now, the device will be formatted using the following command:
esxcli nvme device namespace format -A vmhba2 -f 0 -n 1 -m 0 -p 0 -l 0 -s 0Now, to test if this resolved the issue, time to try to add a new datastore using the NVMe drive. The process for this is as follows:
1. Under “Storage”, right click and select “New datastore”
2. Select “Create new VMFS datastore".
3. Select a device (notice the NVMe disk is now available). Provide a name and select "Next". In this case, it will be used for a VCF workload domain. So, the name reflects its use.
4. Select a partitioning option (usually use the total space and the latest VMFS), then click “Next”.
5. Validate, the select “Finish”
Once the host finishes configuring the drive as a new datastore, it will appear under the storage listings. The storage is now ready for use in your environment.
Conclusion
While this is not an issue that one may commonly come across, it can still cause a lost of time in troubleshooting and testing. It is a common practice in home labs to purchase and install used hardware. There are a few organizations that may also do the same to save cost. Due to privacy and security concerns, it is always best practice to securely wipe drives before reselling or disposing of them. This process should leave the drives without a partition and fully recognizable by the operating system. However, not everyone follows these processes. In addition, when upgrading and modifying systems, it is best to check all aspects of compatibility. In this case, the assumption was made that since the drive had the correct interface and was an SSD, it should work without issue. There was no thought given to the fact that the array controller would not recognize NVMe. This shows the detail needed in analyzing parts as lack of compatibility is typically not a valid reason for a return\refund when purchasing used hardware.
I have over 30 years in the IT industry. During this time I have worked with a variety of products in a variety of industries.
Have a question about something in this article? You can receive help directly from the article author. Sign up for a free trial to get started.
Comments (0)