Migrate Small Business Server 2003 to Small Business Server 2011


Published:
Browse All Articles > Migrate Small Business Server 2003 to Small Business Server 2011
This guide is intended to provide step by step instructions on how to migrate from Small Business Server 2003 to Small Business Server 2011.
NOTE: This guide has been written using the preview version of SBS2011 therefore some of the screens may look slightly different on the final release.
For this migration to work you will need the following software:
The absolute first thing you need to do is take a SYSTEM STATE backup of your Small Business Server as well as a full system backup. There is little chance of the data getting lost but the SYSTEM STATE backup backs up Active Directory so that if it all goes wrong we can recover it if needed.
To do this from using your preferred backup product ensure that System Stare is selected from the selection list then run a backup.
What you then need to do on the SBS 2003 server is to make sure you have all the latest available updates. This means you should at a minimum have:
Once you have installed all of the above, run Windows Update and make sure you select the option in the blue banner bar across the top for Microsoft Update. Microsoft Update will then allow you to update all Microsoft products installed on the server providing a more comprehensive update solution. Keep running the check and installing all updates until there are no more available. Further details on this process can be found in my article here: https://www.experts-exchange.com/OS/Microsoft_Operating_Systems/Windows/Windows_7/A_3236-Get-more-from-Windows-Updates.html
Check the health of your Active Directory by running DCDIAG, if there is anything reported as an error fix it before moving on.
A common problem that can cause this migration to fail is that the SBS 2003 server does not have its own IP address listed for DNS in the network properties under TCP/IP. If this is the case, update it so that it does (do not use the loopback 127.0.0.1 address).
Before you can migrate from SBS2003 it needs to be configured in a single NIC configuration and ISA server (if in use) needs to be removed.
To do this uninstall the ISA components from Add/Remove programmes.
You may also need an additional internet router appropriate for the type of connection you use. This should support NAT and needs to be configured with an IP address to match the internal NIC on your server.
Once you have done this, disable the second NIC and then run the Connect to the Internet Wizard to ensure SBS2003 is configured correctly.
I would then suggest a reboot to ensure that all these changes are taken in to effect.
As part of the Migration Preparation tool it will run the best practice analyzer to identify any issues with the current setup. Before you run the tool you will need to download and install from Microsoft Baseline Configuration Analyzer which can be downloaded from: http://www.microsoft.com/downloads/en/details.aspx?familyid=1B6E9026-F505-403E-84C3-A5DEA704EC67&displaylang=en
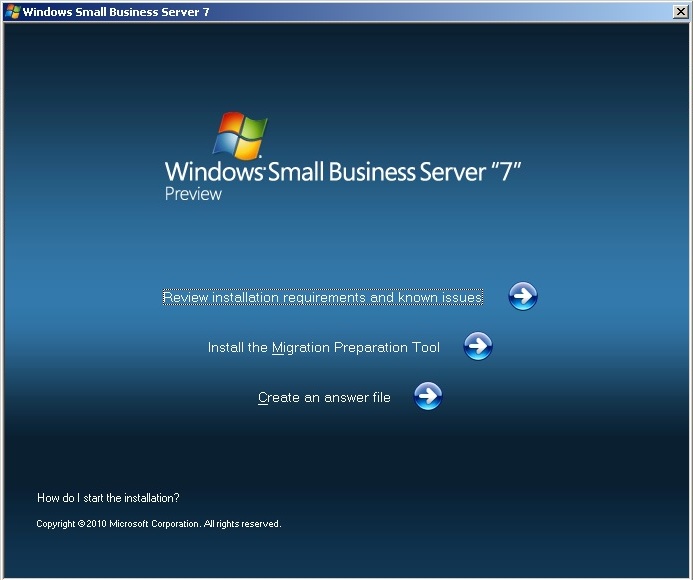
We can then run the wizard by inserting the SBS2011 DVD in to the SBS2003 server drive. Allow it to autoplay and you should see the following screen. If you don't have a DVD drive in the SBS2003 server then there are a few options. Either use a USB DVD Drive, share the drive out from another workstation that does have a DVD drive, or copy the contents of the SBS2011 DVD to the SBS2003 server hard drive. The folders you require specifically are TOOLS and SOURCES. If you copy these 2 folders then instead of seeing the link below you will need to run the SourceTool installer from the TOOLS folder.
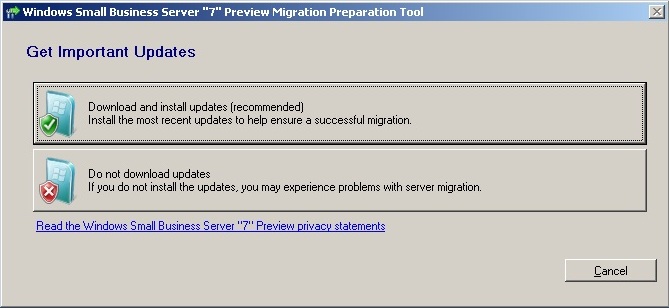
![sbs2003-Preparation-Tool.jpg]() From here we need to select the option for Install the Migration Preparation Tool. The first screen we will see asks about getting and installing installation updates. My recommendation here would be to not install updates unless you are encountering an issue that has been identified by the SBS team and you are following specific advice regarding this. (screen below)
From here we need to select the option for Install the Migration Preparation Tool. The first screen we will see asks about getting and installing installation updates. My recommendation here would be to not install updates unless you are encountering an issue that has been identified by the SBS team and you are following specific advice regarding this. (screen below)
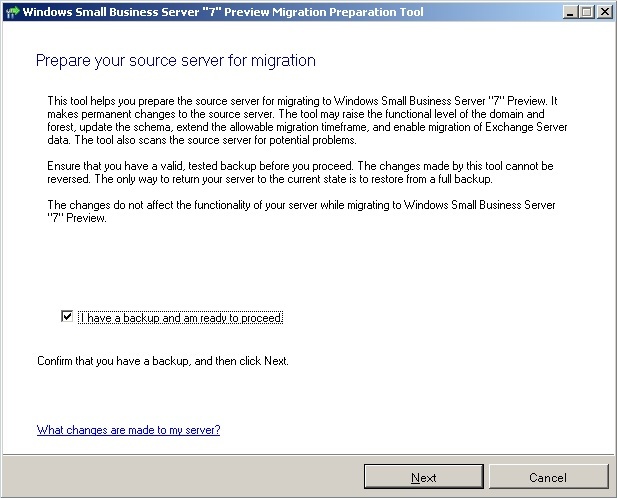
![sbs2003-Preparation-Tool-01.jpg]() Once you have made your choice, the following screen will ask you to confirm that you have an adequate backup of the SBS system. Obviously the data needs to be backed up. But the important thing that needs to be backed up that is often missed is the System State Backup. This includes Active Directory and will be needed to recover with should the migration fail. (screen below)
Once you have made your choice, the following screen will ask you to confirm that you have an adequate backup of the SBS system. Obviously the data needs to be backed up. But the important thing that needs to be backed up that is often missed is the System State Backup. This includes Active Directory and will be needed to recover with should the migration fail. (screen below)
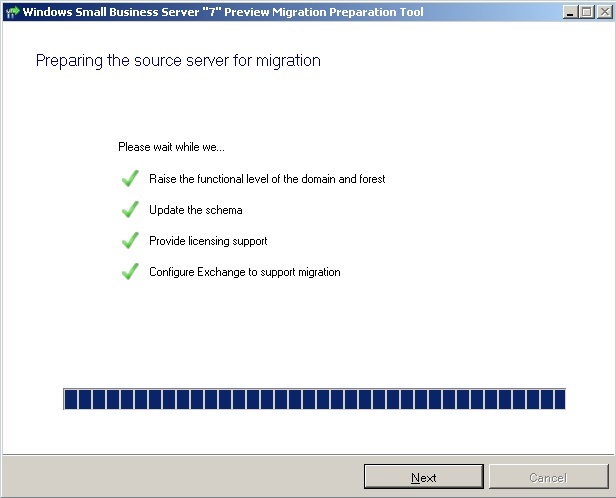
![sbs2003-Preparation-Tool-02.jpg]() Once you check the box to say you have a backup and click next you will see the screen below. This is preparing Exchange and Active Directory for the introduction of your new SBS2011 server. We are looking for 4 green ticks here.
Once you check the box to say you have a backup and click next you will see the screen below. This is preparing Exchange and Active Directory for the introduction of your new SBS2011 server. We are looking for 4 green ticks here.
![sbs2003-Preparation-Tool-03.jpg]() Once this has completed click next. The next stage is the Migration Wizard will use the baseline analyzer tools you installed earlier to check the organisation for any misconfigurations that should cause the migration to fail (screen below)
Once this has completed click next. The next stage is the Migration Wizard will use the baseline analyzer tools you installed earlier to check the organisation for any misconfigurations that should cause the migration to fail (screen below)
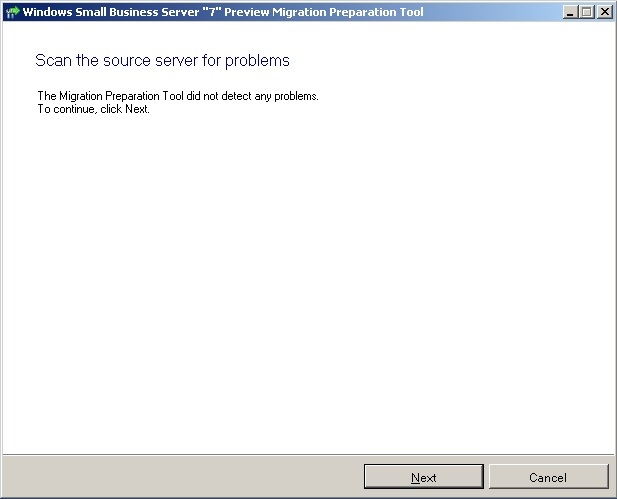
![sbs2003-Preparation-Tool-04.jpg]() This could take a few minutes but what we are hoping to see is the screen below that says we have no errors. This means we are ready to proceed with the introduction of the new server.
This could take a few minutes but what we are hoping to see is the screen below that says we have no errors. This means we are ready to proceed with the introduction of the new server.
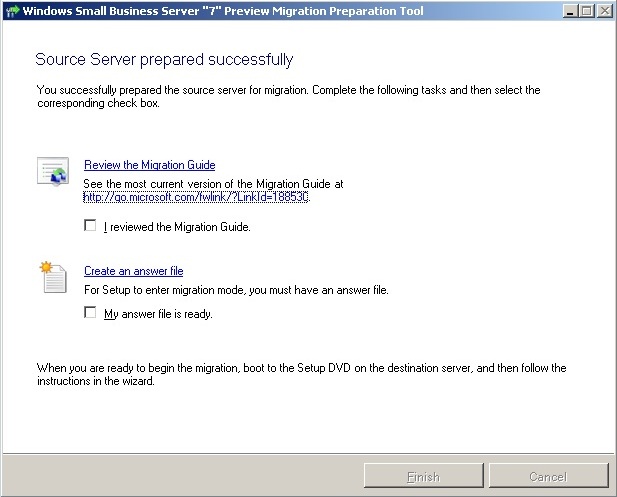
![sbs2003-Preparation-Tool-05.jpg]() Clicking Next to move on will tell us the source server has been successfully (image below) prepared and give us the option to view the migration guide. At time of writing this article there was no migration content on the link provided.
Clicking Next to move on will tell us the source server has been successfully (image below) prepared and give us the option to view the migration guide. At time of writing this article there was no migration content on the link provided.
![sbs2003-Preparation-Tool-06.jpg]()
The second option is to create an answer file. This is essential for the successful migration to SBS2011 so click this option and complete with the detail as illustrated below. The reason I select these options is that it then asks you to confirm some information at the installation stage. Almost like a second check before proceeding. One of the key options is not to perform any updates. This can be done after the migration, and with my experience from SBS2008 migrations these updates have been known to make changes which cause the migration to fail.
![Answer-File-01.jpg]() Now we need to save the answer file using the save option. Once done, copy it to a USB drive and place this in your new server along with the SBS2011 DVD and post up.
Now we need to save the answer file using the save option. Once done, copy it to a USB drive and place this in your new server along with the SBS2011 DVD and post up.
The first screen we see is the language and keyboard selection screen (image below)
![sbs2011-install.jpg]() Make the appropriate selections and click next.
Make the appropriate selections and click next.
We then see the screen below. Click Install Now
![sbs2011-install-02.jpg]() We are then presented with the usual License Agreement screen (below). Put a check in the check box and click Next. Obviously only if you agree to the licensing terms as set out by Microsoft.
We are then presented with the usual License Agreement screen (below). Put a check in the check box and click Next. Obviously only if you agree to the licensing terms as set out by Microsoft.
![sbs2011-install-03.jpg]() The following screen (below) provides any storage that has already been configured on your new hardware. If you don't see anything here you will need to load 3rd party drivers from your vendor using the Load Driver option. If you still don't see anything listed then you may need to configure your RAID Controller so that there is a volume, most will do this by default on first boot if you don't select to configure yourself, but some might not.
The following screen (below) provides any storage that has already been configured on your new hardware. If you don't see anything here you will need to load 3rd party drivers from your vendor using the Load Driver option. If you still don't see anything listed then you may need to configure your RAID Controller so that there is a volume, most will do this by default on first boot if you don't select to configure yourself, but some might not.
![sbs2011-install-05.jpg]() Once you have made the appropriate selections click next and we will see the usual Windows 2008 R2 component configuration and file copy screen as below.
Once you have made the appropriate selections click next and we will see the usual Windows 2008 R2 component configuration and file copy screen as below.
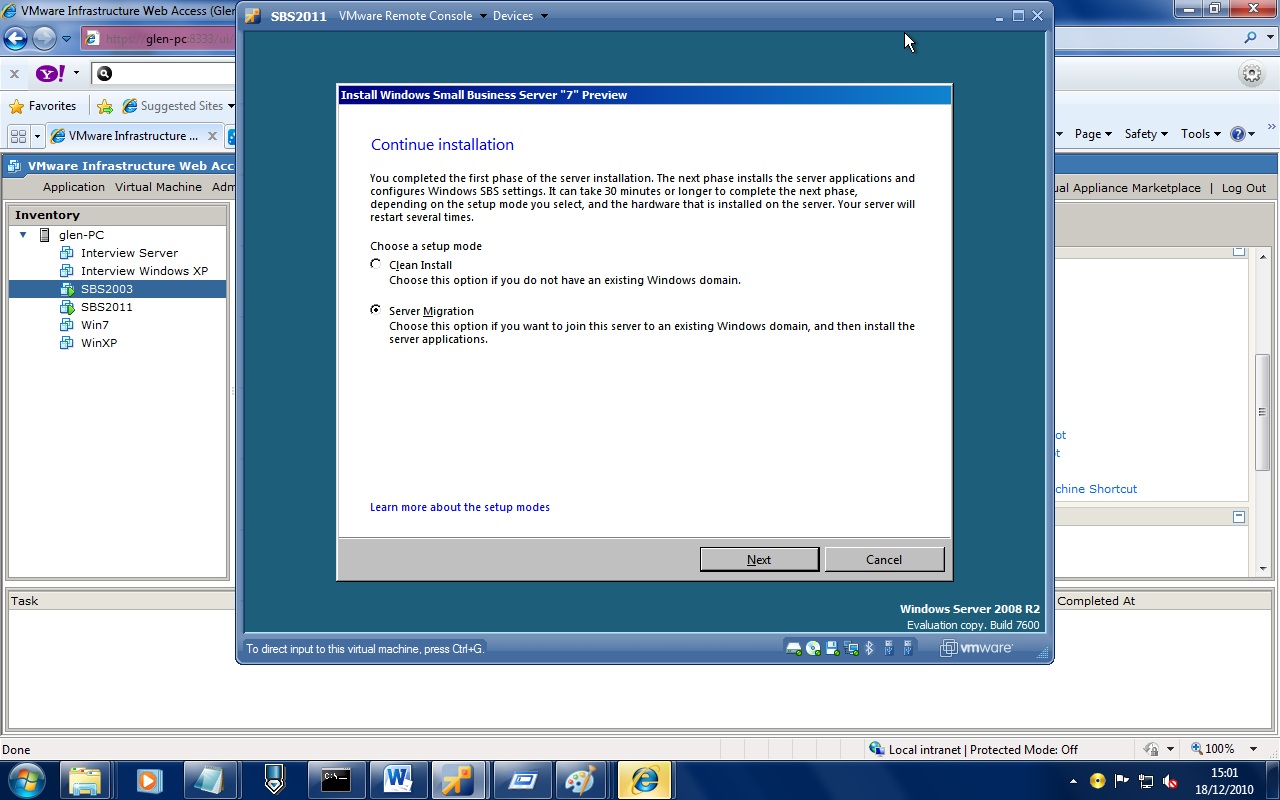
![sbs2011-install-06.jpg]() Once this has finished the server will reboot and display the screen below. As this is a migration we will be selecting Server Migration and then click next.
Once this has finished the server will reboot and display the screen below. As this is a migration we will be selecting Server Migration and then click next.
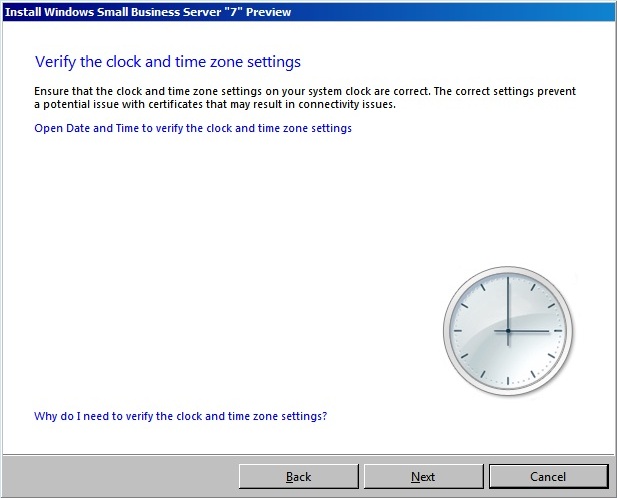
The screen below is the time zone and date/time selection screen. It is absolutely essential that this matches the source server otherwise connection to the domain and promotion to a domain controller will fail.
![sbs2011-install-07.jpg]() Verify the time zone and date/time then click Next.
Verify the time zone and date/time then click Next.
![sbs2011-install-09.jpg]() The screen below asks you to verify the source server IP address, the IP address you wish to assign the new server and the gateway address. Confirm the details and then click next.
The screen below asks you to verify the source server IP address, the IP address you wish to assign the new server and the gateway address. Confirm the details and then click next.
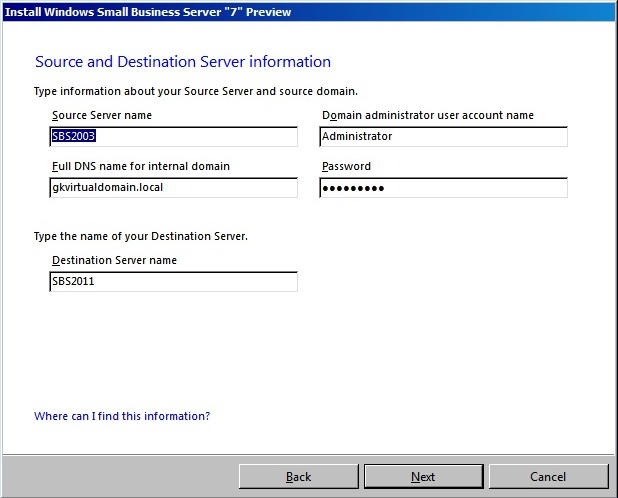
![sbs2011-install-10.jpg]() The next screen is more confirmation. This time it is the source server name and internal domain name along with the administrative user details and the source server name.
The next screen is more confirmation. This time it is the source server name and internal domain name along with the administrative user details and the source server name.
![sbs2011-install-11.jpg]() Confirm the details, and even retype the password just to be sure. Then click Next.
Confirm the details, and even retype the password just to be sure. Then click Next.
We then see the update screen below. Again, my recommendation here would be to not install udates. And then click next.
![sbs2011-install-12.jpg]() The screen below is your company details, this will be used on Companyweb/Remote Web Workplace. Fill in the form an click next.
The screen below is your company details, this will be used on Companyweb/Remote Web Workplace. Fill in the form an click next.
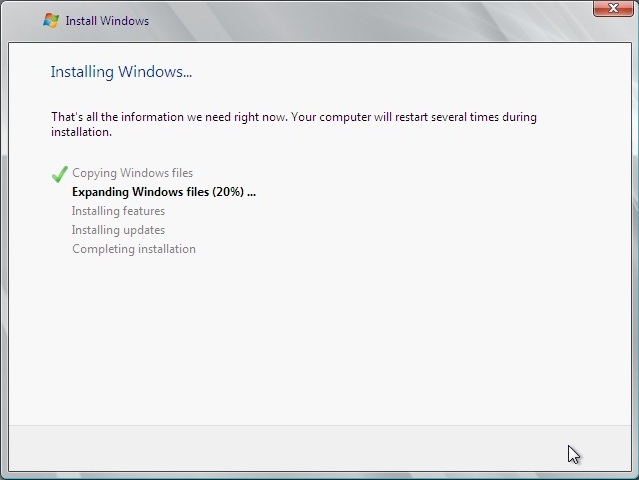
![sbs2011-install-13.jpg]() We then see the screen below which is the start of the SBS2011 component installation, this could take around 30-45 minutes and you can expect the server to reboot at least once during this phase.
We then see the screen below which is the start of the SBS2011 component installation, this could take around 30-45 minutes and you can expect the server to reboot at least once during this phase.
![sbs2011-install-14.jpg]() Once this has finished you should be presented with the SBS2011 desktop and the screen below. This means that the installation phase of the migration has been completed.
Once this has finished you should be presented with the SBS2011 desktop and the screen below. This means that the installation phase of the migration has been completed.
![sbs2011-install-15.jpg]() If there were any problems with the migration you would see a troubleshooting assistant informing you of what has failed and how to correct it.
If there were any problems with the migration you would see a troubleshooting assistant informing you of what has failed and how to correct it.
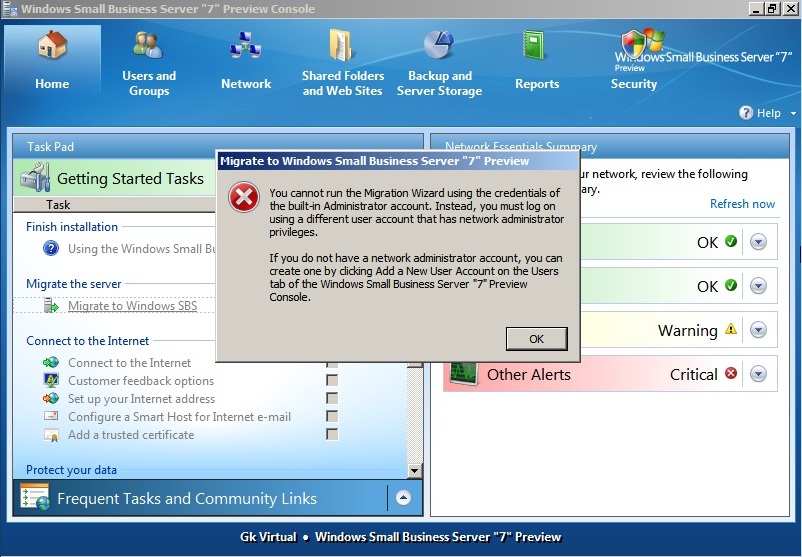
![SBS2011-PostInstall-01.jpg]() As with SBS2008 most of the tasks we need to complete need to be performed with an Administrative user other than the built in Administrator account. This was not the case with SBS2003 and you probably do not have another Administrative user. If this is not completed we will receive the error below when trying to launch the Migration Wizard
As with SBS2008 most of the tasks we need to complete need to be performed with an Administrative user other than the built in Administrator account. This was not the case with SBS2003 and you probably do not have another Administrative user. If this is not completed we will receive the error below when trying to launch the Migration Wizard
![SBS2011-PostInstall-02.jpg]() So the first step is to create this user.
So the first step is to create this user.
Using the SBS Console select the Users and Groups option across the top of the console. You will then see the screen as illustrated below.
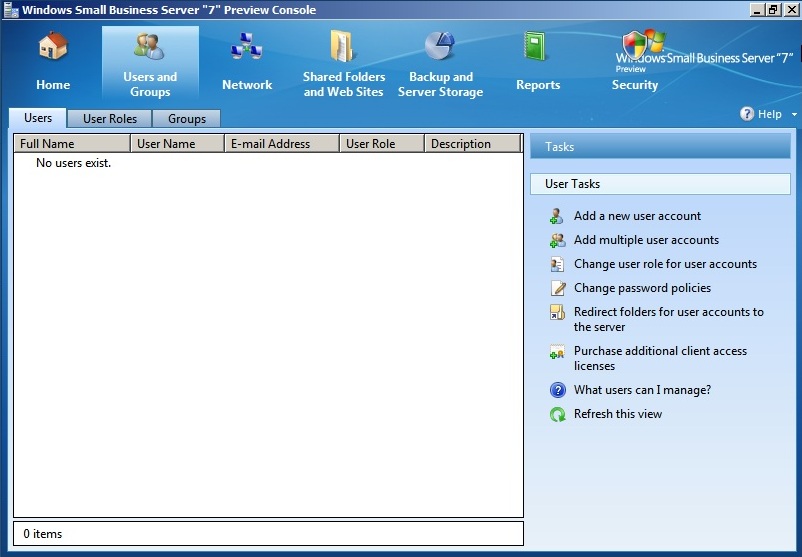
![SBS2011-PostInstall-03.jpg]() There will be no users listed here, don't panic, this is perfectly normal. You will not see the existing users in the SBS Console until the migration is complete.
There will be no users listed here, don't panic, this is perfectly normal. You will not see the existing users in the SBS Console until the migration is complete.
Click on the Add a new user account on the right hand side. This will launch the new user wizard.![Admin-User-01.jpg]() Enter the details for your user. The important part is that you select Network Administrator as the User Role. Once you are done click next.
Enter the details for your user. The important part is that you select Network Administrator as the User Role. Once you are done click next.
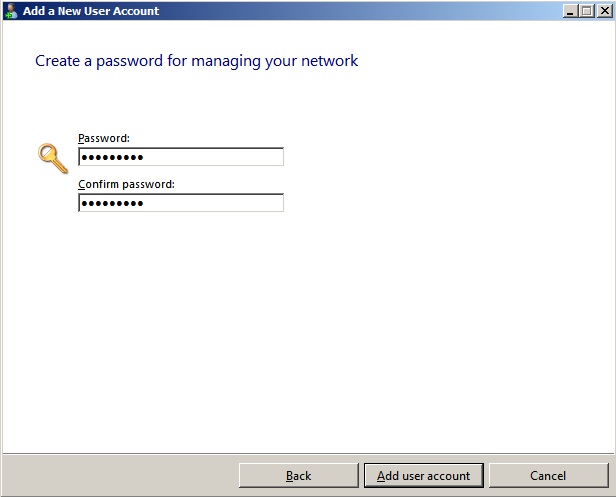
The following screen we are asked to enter a password for the user, enter a password and click Add User Account.
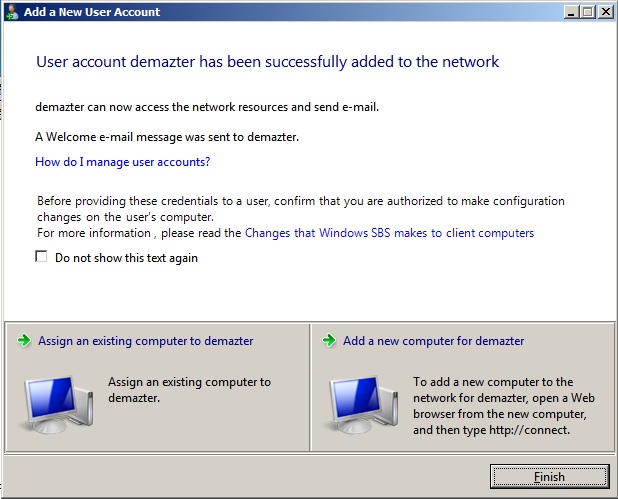
![Admin-User-02.jpg]() We then see the following screen, this can take a few minutes to complete but what we are looking for is 5 green ticks. If for any reason any of the stages fail the final screen will tell you what failed and why.
We then see the following screen, this can take a few minutes to complete but what we are looking for is 5 green ticks. If for any reason any of the stages fail the final screen will tell you what failed and why.
![Admin-User-03.jpg]() The following screen allows us to associate computers with this user or add an additional computer. There is no need to do this for the new Administrative User. Click finish to exit the wizard. From the SBS Console select the Home section and click Migrate to Windows SBS to start the migration tasks.
The following screen allows us to associate computers with this user or add an additional computer. There is no need to do this for the new Administrative User. Click finish to exit the wizard. From the SBS Console select the Home section and click Migrate to Windows SBS to start the migration tasks.
![Admin-User-04.jpg]()
![Migration-Wizard-01.jpg]() The first task is to set the data locations for Exchange, Sharepoint, Shared Folders, Redirected My Documents and Windows Software Update Services. The wizards are the same for each so this guide will only run through one of them.
The first task is to set the data locations for Exchange, Sharepoint, Shared Folders, Redirected My Documents and Windows Software Update Services. The wizards are the same for each so this guide will only run through one of them.
NOTE: If you don't have a second volume configured there is no need to run this part. If you try to you will receive the following error.
![Migration-Wizard-Error.jpg]() If you do not have a second volume and don't intend to have one, then on the first screen of the wizard put a check in the Task Complete radio and click next.
If you do not have a second volume and don't intend to have one, then on the first screen of the wizard put a check in the Task Complete radio and click next.
![Migration-Wizard-02.jpg]() To run the wizards click the hyperlinks on the above screen one by one. The first screen (below) is simply the summary of what you will be doing, click next when ready.
To run the wizards click the hyperlinks on the above screen one by one. The first screen (below) is simply the summary of what you will be doing, click next when ready.
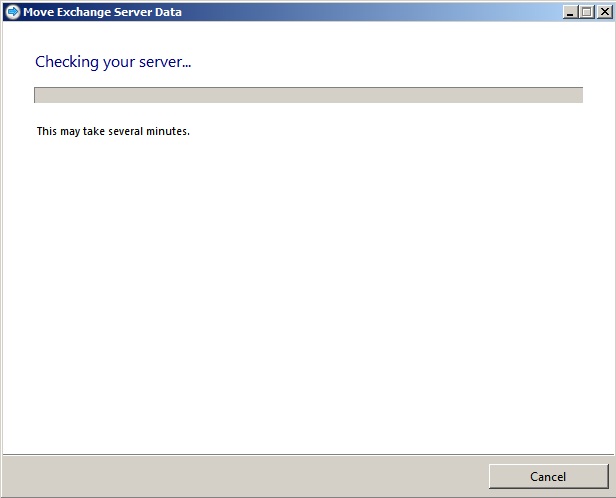
![Migration-Wizard-03.jpg]() The next screen runs a check of the configuration, one of the tasks this is completing is checking for available volumes and disk space for the files to be moved to.
The next screen runs a check of the configuration, one of the tasks this is completing is checking for available volumes and disk space for the files to be moved to.
![Migration-Wizard-04.jpg]() Once this is complete we are given the options of locations to select from. At this stage because we have not configured a backup you will see an error that this has not been done. Click OK to continue.
Once this is complete we are given the options of locations to select from. At this stage because we have not configured a backup you will see an error that this has not been done. Click OK to continue.
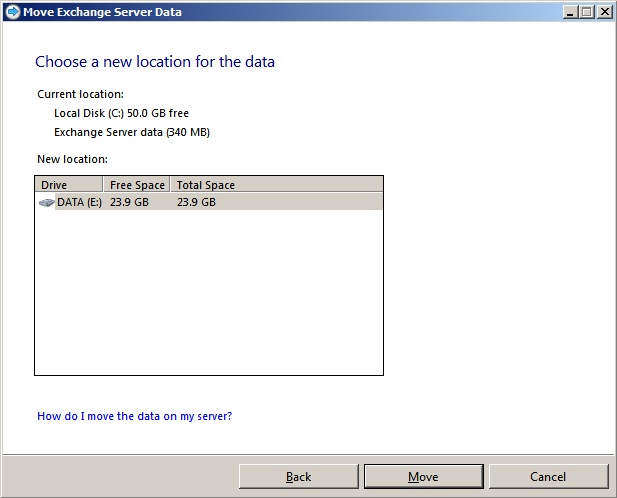
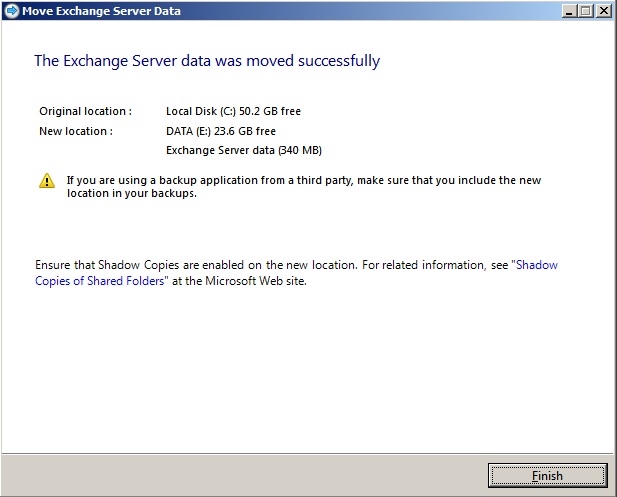
![Migration-Wizard-06.jpg]() Make the drive selection and then click Move. What we want to see is the screen below indicating that the move has been successful. Click finish and then move on to the next hyperlink to continue setting the data locations.
Make the drive selection and then click Move. What we want to see is the screen below indicating that the move has been successful. Click finish and then move on to the next hyperlink to continue setting the data locations.
![Migration-Wizard-07.jpg]()
When launched, the first screen we see is the one below. From here we need to select the Start the Connect to the Internet Wizard hyper link.
![Migration-Wizard-08.jpg]() The following screen will give you a summary of some information that will be required to allow the wizard to be completed.
The following screen will give you a summary of some information that will be required to allow the wizard to be completed.
![Migration-Wizard-09.jpg]() Make sure you have this information to hand and click Next.
Make sure you have this information to hand and click Next.
The next screen does a check of the network configuration and will attempt to discover among other things your router. Part of these checks will also detect if there are any other DHCP services running on the network.
![Migration-Wizard-10.jpg]() The wizard will not continue if another DHCP service is detected (see image below). Therefore if you plan to use another device for DHCP then this must be temporarily disabled to allow you to complete this task. I would however recommend that you do use SBS2011 for DHCP rather than another device.
The wizard will not continue if another DHCP service is detected (see image below). Therefore if you plan to use another device for DHCP then this must be temporarily disabled to allow you to complete this task. I would however recommend that you do use SBS2011 for DHCP rather than another device.
![Migration-Wizard-11.jpg]() Once you have disabled any DHCP services the wizard will move on and display what it has detected from your network configuration.
Once you have disabled any DHCP services the wizard will move on and display what it has detected from your network configuration.
![Migration-Wizard-12.jpg]() Check the information is correct and if so click Next. If not make any appropriate changes before clicking next.
Check the information is correct and if so click Next. If not make any appropriate changes before clicking next.
Once done, we are looking for the big green tick as illustrated below that says our network has been configured.
![Migration-Wizard-13.jpg]()
The first screen we see is a summary screen explaining what the wizard will do.
![Migration-Wizard-14.jpg]() Click the hyperlink for Start the Internet Address Wizard and then read the guidance on the screen below.
Click the hyperlink for Start the Internet Address Wizard and then read the guidance on the screen below.
![Migration-Wizard-15.jpg]() As this is a migration you will probably already have an external domain name and it will already be configured. The rest of this guide will assume you have a domain name registered and that you will use the control panel from your ISP to manage your External DNS. Click Next to start the configuration.
As this is a migration you will probably already have an external domain name and it will already be configured. The rest of this guide will assume you have a domain name registered and that you will use the control panel from your ISP to manage your External DNS. Click Next to start the configuration.
On the following screen, select the I already have a domain name that I want to use and click Next.
![Migration-Wizard-16.jpg]() On this screen select the I want to manage the domain name myself and click Next.
On this screen select the I want to manage the domain name myself and click Next.
![Migration-Wizard-17.jpg]() The following screen we need to enter the external domain name we will be using, this will be the domain name used in the hyperlink for Remote Web Workplace, Outlook Web App, ActiveSync and will be used to create your email address.
The following screen we need to enter the external domain name we will be using, this will be the domain name used in the hyperlink for Remote Web Workplace, Outlook Web App, ActiveSync and will be used to create your email address.
![Migration-Wizard-18.jpg]() Clicking the Advanced Settings link will allow us to reconfigure the name that appears in the self-signed SSL certificate from remote.domainname.com to something else. If you have mail.domainname.com or owa.domainname.com setup currently then this is where you would enter this information.
Clicking the Advanced Settings link will allow us to reconfigure the name that appears in the self-signed SSL certificate from remote.domainname.com to something else. If you have mail.domainname.com or owa.domainname.com setup currently then this is where you would enter this information.
Once done click the configure button and the wizard will make the necessary changes. Once completed we want to see the summary screen as below. We are looking for 3 green ticks to say it has been successful.
![Migration-Wizard-20.jpg]()
![Migrate-Exchange-Mailboxes-And-Settings-01.jpg]() Clicking the hyperlink (at time of writing) takes you to the technet article for Migrating Mailboxes. To do this, we need to delve in to the Exchange Management Console. Click Start > All Programs > Microsoft Exchange Server 2010 and select Exchange Management Console.
Clicking the hyperlink (at time of writing) takes you to the technet article for Migrating Mailboxes. To do this, we need to delve in to the Exchange Management Console. Click Start > All Programs > Microsoft Exchange Server 2010 and select Exchange Management Console.
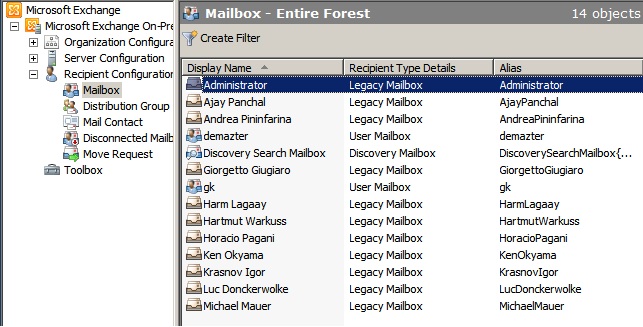
Once the console has launched, navigate to Recipient Configuration > Mailbox. Here we should see all our mailboxes listed. All the mailboxes that appear as Legacy Mailbox are currently located on the SBS2003 servers mailstore.
![Migrate-Exchange-Mailboxes-And-Settings-02.jpg]() You can either batch select the mailboxes using SHIFT or CTRL or do each mailbox one by one. Once you have selected the mailboxes to move, from the Action Pane on the right hand side select New Local Move Request. This will start the move mailbox wizard.
You can either batch select the mailboxes using SHIFT or CTRL or do each mailbox one by one. Once you have selected the mailboxes to move, from the Action Pane on the right hand side select New Local Move Request. This will start the move mailbox wizard.
![Migrate-Exchange-Mailboxes-And-Settings-03.jpg]() From the first screen click the browse button to select the Mailbox Store on the new SBS2011 Server. Once you have done this click Next.
From the first screen click the browse button to select the Mailbox Store on the new SBS2011 Server. Once you have done this click Next.
![Migrate-Exchange-Mailboxes-And-Settings-04.jpg]() For this screen, leave it at defaults for the first run. If you find that mailboxes fail to move due to corrupt items you may have to increase the value here to allow those corrupt items to be skipped and for the mailbox to move successfully.
For this screen, leave it at defaults for the first run. If you find that mailboxes fail to move due to corrupt items you may have to increase the value here to allow those corrupt items to be skipped and for the mailbox to move successfully.
![Migrate-Exchange-Mailboxes-And-Settings-05.jpg]() The screen above is simply a summary of what task you will be performing, clicking the New button will start the mailbox moves.
The screen above is simply a summary of what task you will be performing, clicking the New button will start the mailbox moves.
Once complete, we are looking for the following screen, all green ticks.
![Migrate-Exchange-Mailboxes-And-Settings-06.jpg]() If you are moving the mailboxes in batches then repeat this task until all mailboxes have been moved to the SBS2011 server.
If you are moving the mailboxes in batches then repeat this task until all mailboxes have been moved to the SBS2011 server.
The next stage is to migrate the Public Folders. To do this, complete the following steps on the SBS 2003 Server:
Now that we have moved the data to the SBS2011 server it’s best to leave the Exchange Settings as is for a day or so to a) make sure all the data is moved before we perform any other Exchange related tasks. b) allow all the outlook clients to update automatically with the new server settings. We can now continue with the rest of the migration.
Further information on these processes can be found here:
Remove old logon scripts for Windows SBS migration: http://technet.microsoft.com/en-us/library/cc527605(WS.10).aspx
Remove old Active Directory Group Policy objects for Windows SBS 2008 migration: http://technet.microsoft.com/en-us/library/cc527585(WS.10).aspx
Once you have the shares configured a simple backup of the SBS2003 server and restore to the 2011 server will restore all data with associated permissions.
Alternatively you could use robocopy which is part of the Windows 2003 Resource Kit which can be downloaded from: http://www.microsoft.com/downloads/en/details.aspx?familyid=9d467a69-57ff-4ae7-96ee-b18c4790cffd&displaylang=en
There is also command line reference for robocopy here: http://technet.microsoft.com/en-us/library/cc733145(WS.10).aspx
Launching the wizard will display the following screen.
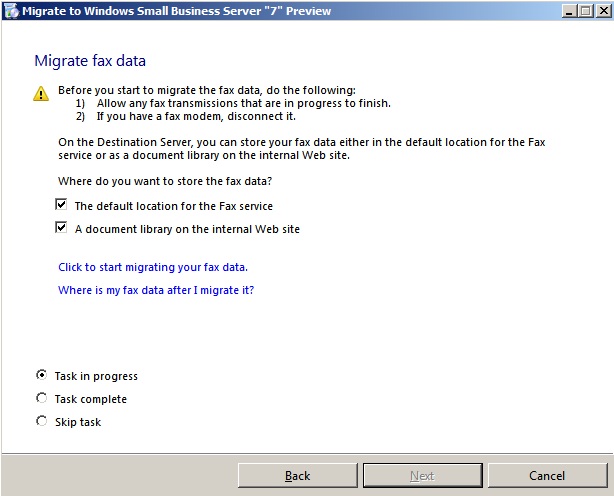
![Migrate-Fax-01.jpg]() Clicking the hyperlink Click to start Migrating your fax data this will move the data to the new server. At this stage if there is no fax services installed/configured on the SBS2003 server you will receive the error displayed below.
Clicking the hyperlink Click to start Migrating your fax data this will move the data to the new server. At this stage if there is no fax services installed/configured on the SBS2003 server you will receive the error displayed below.
![Migrate-Fax-02.jpg]() You will receive this error if you haven't installed the Fax role on to Windows Server. This is an optional step and should only be installed if you will be using fax services.
You will receive this error if you haven't installed the Fax role on to Windows Server. This is an optional step and should only be installed if you will be using fax services.
However, they will not appear in the SBS Console, this is normal and can be resolved following the instructions here.
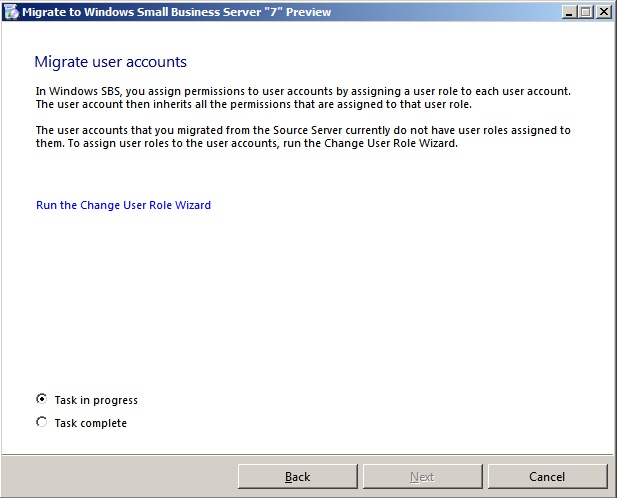
To allow the users to be seen a new role needs to be applied. To do this on the first screen the wizard shows a hyperlink to Run the change user role wizard as illustrated below.
![Migrate-Users-01.jpg]() Click this link, to start the wizard. From the list displayed select the role you wish to assign to these users.
Click this link, to start the wizard. From the list displayed select the role you wish to assign to these users.
![Migrate-Users-02.jpg]() On the following screen put a check in the box for Display all user accounts in the Active Directory as illustrated below. This will display all of the users. Highlight your existing user then click the Add button to move them to the right hand side.
On the following screen put a check in the box for Display all user accounts in the Active Directory as illustrated below. This will display all of the users. Highlight your existing user then click the Add button to move them to the right hand side.
![Migrate-Users-03.jpg]() Click the change user role button. We are looking for a screen similar to the one below with lots of green ticks to confirm the roles have changed.
Click the change user role button. We are looking for a screen similar to the one below with lots of green ticks to confirm the roles have changed.
![Migrate-Users-05.jpg]()
To perform this task we will need Small Business Server 2003 CD 2, which will be asked for during the uninstallation. Before we can do this though, there are a few steps we need to perform otherwise we will not be able to uninstall it.
If you use Recipient Policies that are Manage Mailbox policies, then these will need to be removed. Likewise, if you have Recipient Policies that are used for both e-mail address definition and mailbox management, the settings defined under Mailbox Manager Settings will need to be removed. You DO NOT need to remove your e-mail address policies.
The Recipient Update Service is not used in Exchange 2010 and is therefore not required, so it can be removed. To do this you will need to use ADSI Edit. This can be done by using the following procedure:
The final step in preparation for uninstalling Exchange Server 2003 is to delete the routing group connectors that would have been created as part of the installation. I have highlighted them in the image below. Simply right click on each connector and select delete.
![Uninstall-Exchange-01.jpg]()
We are now ready to uninstall Exchange 2003. To do this, navigate to Start > Control Panel > Add or Remove Programs. From the list of installed applications, highlight Windows Small Business Server 2003 and click Change/Remove.
Click next on the Welcome screen, and next on the screen that follows. Once the component screen opens pull down the drop down next to Exchange Server and select remove, as shown below. Then click next and next again.
![Uninstall-Exchange-02.jpg]()
All of the 5 FSMO roles should already have been transferred to the SBS2011 as part of the installation process but it's always worth a check. The steps below will give instructions on how to do this if required.
Caution needs to be taken when performing this next step. I would advise that ALL of the previous steps need to be completed before this is done as Small Business Server MUST hold all 5 FSMO roles.
Once you are ready, the roles can be transferred as follows. Working on the Windows 2008 server do the following:
That is 3 of the 5 roles transferred. To do the next one, which is the Domain Naming Master we need to do the following:
At this point it is worth double checking that both the SBS2003 and SBS2011 server are both configured to use the SBS2011 server for DNS in the TCP/IP properties of the NIC. The only DNS entry should be the IP address of the SBS2011 server.
The first thing we need to do is make sure the SBS2003 is no longer a Global Catalog Server. Click on Start > Administrative Tools > Active Directory Sites and Services. Locate the Small Business Server as shown in the screen shot below.
Right click on NTDS settings located under the Small Business Server and select properties. Remove the check from the Global Catalog check box and click OK. Close Active Directory Sites and Services snap-in.
The final step is to run DCPROMO. To do this, do the following:
Once this has finished, allow the server to restart, login and then shut it down. You have now completed the migration.
The only additional step would be the Trusted Certificate Wizard. This is not a requirement to make everything work it just makes the annoying certificate messages go away on external clients and mobile phones. You can get a certificate that will satisfy this requirement from http://www.exchangecertificates.com
If you are still with me, well done! There are a few sections of additional reading below if you would like to know some more detail about some of the processes we have just completed. There is an excellent article from EE Expert tigermatt around the purpose of the FSMO roles which you will find under the further reading section.
om/en-us/library/cc288664.aspx
Move last legacy Exchange Server: http://technet.microsoft.com/en-us/library/bb288905(EXCHG.80).aspx
Demystifying the Active Directory FSMO Roles by tigermatt: http://www.experts-exchange.com/articles/Software/Server_Software/File_Servers/Active_Directory/Demystifying-the-Active-Directory-FSMO-Roles.html
NOTE: This guide has been written using the preview version of SBS2011 therefore some of the screens may look slightly different on the final release.
For this migration to work you will need the following software:
Windows Small Business Server 2003 (SBS 2003)
Windows Small Business Server 2011
Microsoft Baseline Configuration Analyzer which can be downloaded from: http://www.microsoft.com/downloads/en/details.aspx?familyid=1B6E9026-F505-403E-84C3-A5DEA704EC67&displaylang=en
Steps required:
1. Health Checks on Small Business Server 2003
2. Configure SBS2003 for single NIC
3. Run Migration Preparation tool on SBS2003 & Create Answerfile
4. Administrative User Creation
5. Setting data locations
6. Configure the Network
7. Configure the Internet Address
8. Migrate Exchange Mailboxes and Settings
9. Remove Legacy Group Policies and Logon Settings
10. Migrate users' Shared Data
11. Migrate Fax Data
12. Migrate Users and Groups
13. Uninstall Exchange 2003 from Small Business Server 2003
14. Check Transfer of the 5 FSMO roles to SBS2011
15. DCPROMO SBS 2003 server so it is no longer a domain controller and remove from network
Step 1. Health Checks on Small Business Server 2003
The absolute first thing you need to do is take a SYSTEM STATE backup of your Small Business Server as well as a full system backup. There is little chance of the data getting lost but the SYSTEM STATE backup backs up Active Directory so that if it all goes wrong we can recover it if needed.
To do this from using your preferred backup product ensure that System Stare is selected from the selection list then run a backup.
What you then need to do on the SBS 2003 server is to make sure you have all the latest available updates. This means you should at a minimum have:
Windows 2003 Service Pack 2 - verify this by right clicking on My Computer and select properties. It should tell you here the Windows Service Pack
Windows Small Business Server Service Pack 1 - verify this by checking the registry key HKEY_LOCAL_MACHINE\Software\Microsoft\SmallBusinessServer\ServicePackNumber you are looking for a value of 1 in the bracket.
Microsoft Exchange 2003 Service Pack 2 - verify this using the Exchange System Manager. Navigate to first administrative > Servers. With the Servers folder highlighted on the right hand side you will see the SBS2003 servername with the service pack version listed.
Once you have installed all of the above, run Windows Update and make sure you select the option in the blue banner bar across the top for Microsoft Update. Microsoft Update will then allow you to update all Microsoft products installed on the server providing a more comprehensive update solution. Keep running the check and installing all updates until there are no more available. Further details on this process can be found in my article here: https://www.experts-exchange.com/OS/Microsoft_Operating_Systems/Windows/Windows_7/A_3236-Get-more-from-Windows-Updates.html
Check the health of your Active Directory by running DCDIAG, if there is anything reported as an error fix it before moving on.
A common problem that can cause this migration to fail is that the SBS 2003 server does not have its own IP address listed for DNS in the network properties under TCP/IP. If this is the case, update it so that it does (do not use the loopback 127.0.0.1 address).
Step 2 - Configure SBS2003 for single NIC
Before you can migrate from SBS2003 it needs to be configured in a single NIC configuration and ISA server (if in use) needs to be removed.
To do this uninstall the ISA components from Add/Remove programmes.
You may also need an additional internet router appropriate for the type of connection you use. This should support NAT and needs to be configured with an IP address to match the internal NIC on your server.
Once you have done this, disable the second NIC and then run the Connect to the Internet Wizard to ensure SBS2003 is configured correctly.
I would then suggest a reboot to ensure that all these changes are taken in to effect.
Step 3. Run Migration Preparation tool on SBS2003 & Create Answerfile
As part of the Migration Preparation tool it will run the best practice analyzer to identify any issues with the current setup. Before you run the tool you will need to download and install from Microsoft Baseline Configuration Analyzer which can be downloaded from: http://www.microsoft.com/d
We can then run the wizard by inserting the SBS2011 DVD in to the SBS2003 server drive. Allow it to autoplay and you should see the following screen. If you don't have a DVD drive in the SBS2003 server then there are a few options. Either use a USB DVD Drive, share the drive out from another workstation that does have a DVD drive, or copy the contents of the SBS2011 DVD to the SBS2003 server hard drive. The folders you require specifically are TOOLS and SOURCES. If you copy these 2 folders then instead of seeing the link below you will need to run the SourceTool installer from the TOOLS folder.
 From here we need to select the option for Install the Migration Preparation Tool. The first screen we will see asks about getting and installing installation updates. My recommendation here would be to not install updates unless you are encountering an issue that has been identified by the SBS team and you are following specific advice regarding this. (screen below)
 Once you have made your choice, the following screen will ask you to confirm that you have an adequate backup of the SBS system. Obviously the data needs to be backed up. But the important thing that needs to be backed up that is often missed is the System State Backup. This includes Active Directory and will be needed to recover with should the migration fail. (screen below)
 Once you check the box to say you have a backup and click next you will see the screen below. This is preparing Exchange and Active Directory for the introduction of your new SBS2011 server. We are looking for 4 green ticks here.
 Once this has completed click next. The next stage is the Migration Wizard will use the baseline analyzer tools you installed earlier to check the organisation for any misconfigurations that should cause the migration to fail (screen below)
 This could take a few minutes but what we are hoping to see is the screen below that says we have no errors. This means we are ready to proceed with the introduction of the new server.
 Clicking Next to move on will tell us the source server has been successfully (image below) prepared and give us the option to view the migration guide. At time of writing this article there was no migration content on the link provided.
The second option is to create an answer file. This is essential for the successful migration to SBS2011 so click this option and complete with the detail as illustrated below. The reason I select these options is that it then asks you to confirm some information at the installation stage. Almost like a second check before proceeding. One of the key options is not to perform any updates. This can be done after the migration, and with my experience from SBS2008 migrations these updates have been known to make changes which cause the migration to fail.
 Now we need to save the answer file using the save option. Once done, copy it to a USB drive and place this in your new server along with the SBS2011 DVD and post up.
The first screen we see is the language and keyboard selection screen (image below)
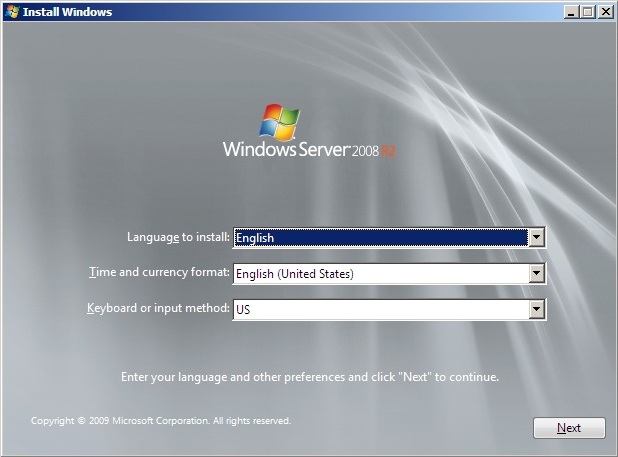 Make the appropriate selections and click next.
We then see the screen below. Click Install Now
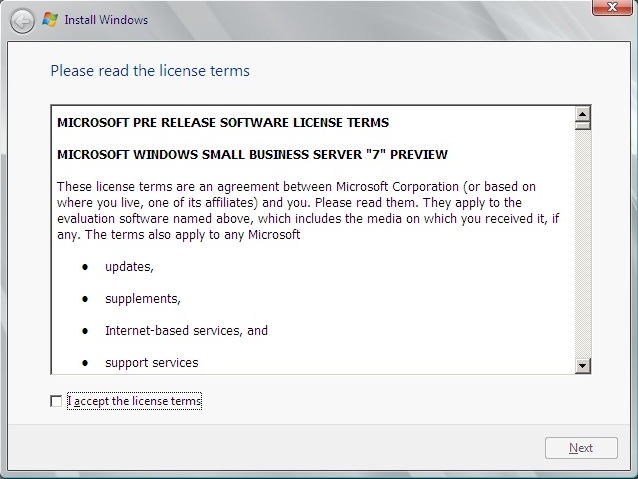
 We are then presented with the usual License Agreement screen (below). Put a check in the check box and click Next. Obviously only if you agree to the licensing terms as set out by Microsoft.
 The following screen (below) provides any storage that has already been configured on your new hardware. If you don't see anything here you will need to load 3rd party drivers from your vendor using the Load Driver option. If you still don't see anything listed then you may need to configure your RAID Controller so that there is a volume, most will do this by default on first boot if you don't select to configure yourself, but some might not.
 Once you have made the appropriate selections click next and we will see the usual Windows 2008 R2 component configuration and file copy screen as below.
 Once this has finished the server will reboot and display the screen below. As this is a migration we will be selecting Server Migration and then click next.
The screen below is the time zone and date/time selection screen. It is absolutely essential that this matches the source server otherwise connection to the domain and promotion to a domain controller will fail.
 Verify the time zone and date/time then click Next.
 The screen below asks you to verify the source server IP address, the IP address you wish to assign the new server and the gateway address. Confirm the details and then click next.
 The next screen is more confirmation. This time it is the source server name and internal domain name along with the administrative user details and the source server name.
 Confirm the details, and even retype the password just to be sure. Then click Next.
We then see the update screen below. Again, my recommendation here would be to not install udates. And then click next.
 The screen below is your company details, this will be used on Companyweb/Remote Web Workplace. Fill in the form an click next.
 We then see the screen below which is the start of the SBS2011 component installation, this could take around 30-45 minutes and you can expect the server to reboot at least once during this phase.
 Once this has finished you should be presented with the SBS2011 desktop and the screen below. This means that the installation phase of the migration has been completed.
 If there were any problems with the migration you would see a troubleshooting assistant informing you of what has failed and how to correct it.
Step 4. Administrative User Creation
Now that SBS2011 has been successfully installed and you have logged in for the first time we will see SBS console. Those of you familiar with SBS2008 will notice that not much has changed.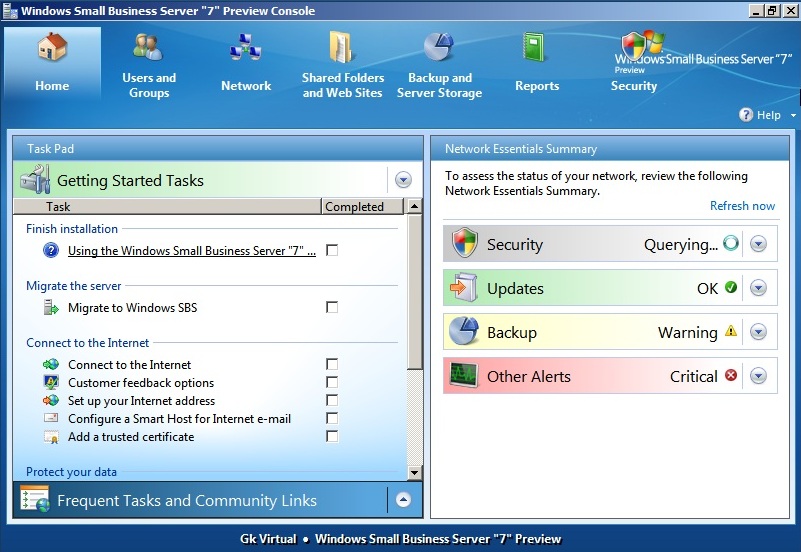 As with SBS2008 most of the tasks we need to complete need to be performed with an Administrative user other than the built in Administrator account. This was not the case with SBS2003 and you probably do not have another Administrative user. If this is not completed we will receive the error below when trying to launch the Migration Wizard
 So the first step is to create this user.
Using the SBS Console select the Users and Groups option across the top of the console. You will then see the screen as illustrated below.
 There will be no users listed here, don't panic, this is perfectly normal. You will not see the existing users in the SBS Console until the migration is complete.
Click on the Add a new user account on the right hand side. This will launch the new user wizard.
 Enter the details for your user. The important part is that you select Network Administrator as the User Role. Once you are done click next.
The following screen we are asked to enter a password for the user, enter a password and click Add User Account.
 We then see the following screen, this can take a few minutes to complete but what we are looking for is 5 green ticks. If for any reason any of the stages fail the final screen will tell you what failed and why.
 The following screen allows us to associate computers with this user or add an additional computer. There is no need to do this for the new Administrative User. Click finish to exit the wizard. From the SBS Console select the Home section and click Migrate to Windows SBS to start the migration tasks.
Step 5. Setting data locations
When launching the migration wizard there is a list of tasks to complete. These should be done in the order they are presented. As illustrated below.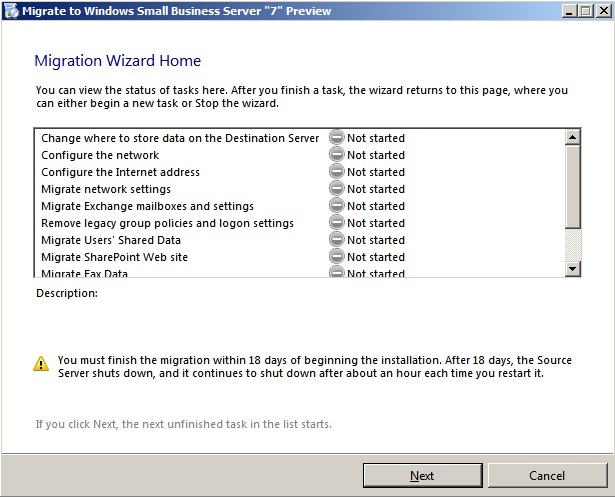 The first task is to set the data locations for Exchange, Sharepoint, Shared Folders, Redirected My Documents and Windows Software Update Services. The wizards are the same for each so this guide will only run through one of them.
NOTE: If you don't have a second volume configured there is no need to run this part. If you try to you will receive the following error.
 If you do not have a second volume and don't intend to have one, then on the first screen of the wizard put a check in the Task Complete radio and click next.
 To run the wizards click the hyperlinks on the above screen one by one. The first screen (below) is simply the summary of what you will be doing, click next when ready.
 The next screen runs a check of the configuration, one of the tasks this is completing is checking for available volumes and disk space for the files to be moved to.
 Once this is complete we are given the options of locations to select from. At this stage because we have not configured a backup you will see an error that this has not been done. Click OK to continue.
 Make the drive selection and then click Move. What we want to see is the screen below indicating that the move has been successful. Click finish and then move on to the next hyperlink to continue setting the data locations.
Step 6. Configure the Network
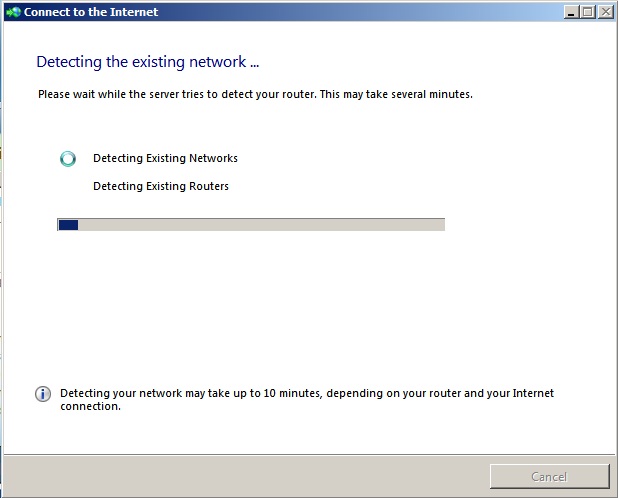
The next task the wizards want us to complete is the Configure the Network wizard. This is the Connect to the Internet Wizard.When launched, the first screen we see is the one below. From here we need to select the Start the Connect to the Internet Wizard hyper link.
 The following screen will give you a summary of some information that will be required to allow the wizard to be completed.
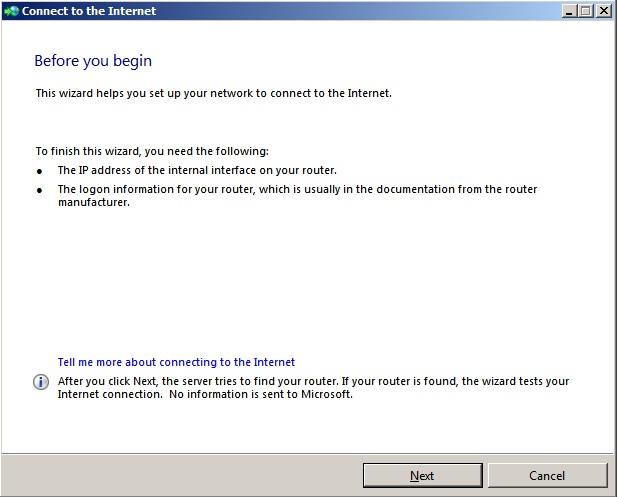 Make sure you have this information to hand and click Next.
The next screen does a check of the network configuration and will attempt to discover among other things your router. Part of these checks will also detect if there are any other DHCP services running on the network.
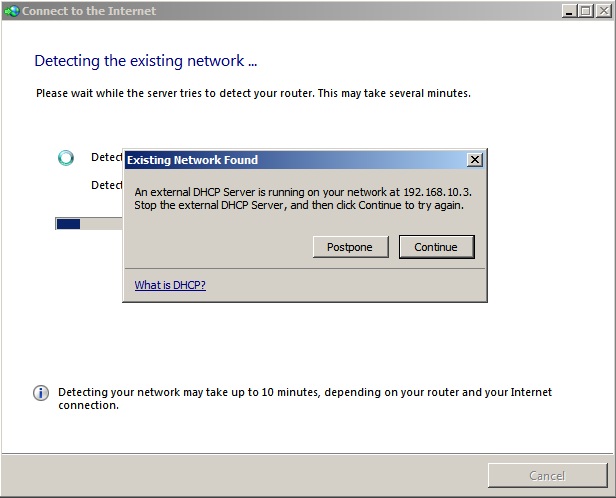
 The wizard will not continue if another DHCP service is detected (see image below). Therefore if you plan to use another device for DHCP then this must be temporarily disabled to allow you to complete this task. I would however recommend that you do use SBS2011 for DHCP rather than another device.
 Once you have disabled any DHCP services the wizard will move on and display what it has detected from your network configuration.
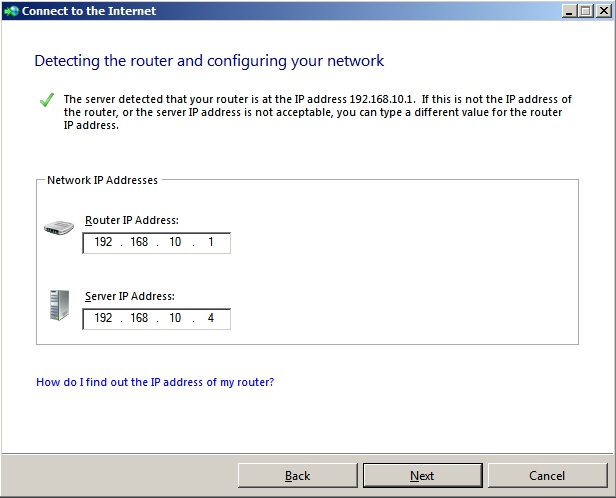 Check the information is correct and if so click Next. If not make any appropriate changes before clicking next.
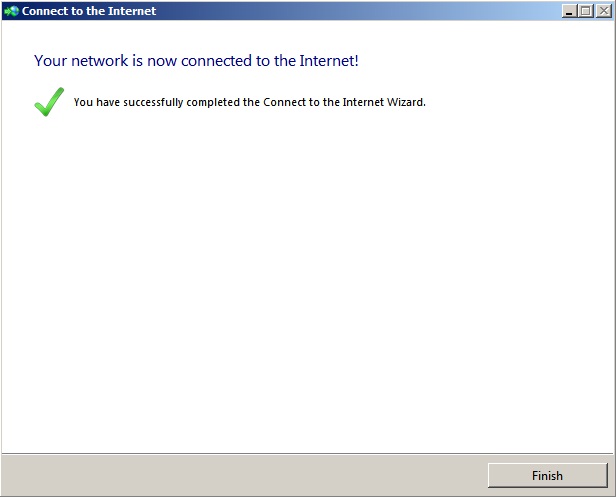
Once done, we are looking for the big green tick as illustrated below that says our network has been configured.
Step 7. Configure the Internet Address
The 3rd task in the migration wizard is to Configure the Internet Address this wizard is for configuring the external domain you intend to use with the SBS2011 server.The first screen we see is a summary screen explaining what the wizard will do.
 Click the hyperlink for Start the Internet Address Wizard and then read the guidance on the screen below.
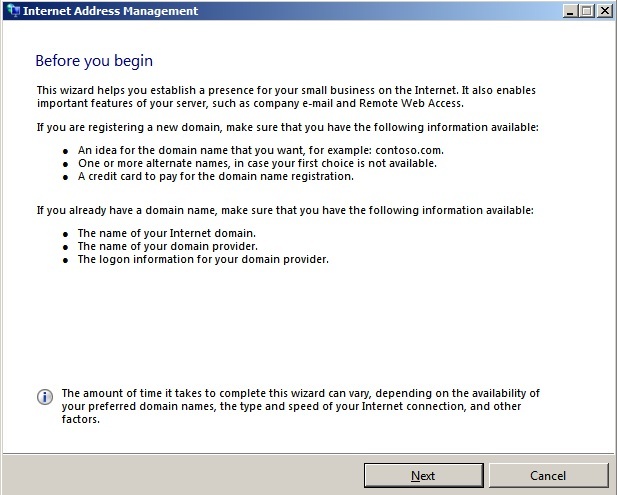 As this is a migration you will probably already have an external domain name and it will already be configured. The rest of this guide will assume you have a domain name registered and that you will use the control panel from your ISP to manage your External DNS. Click Next to start the configuration.
On the following screen, select the I already have a domain name that I want to use and click Next.
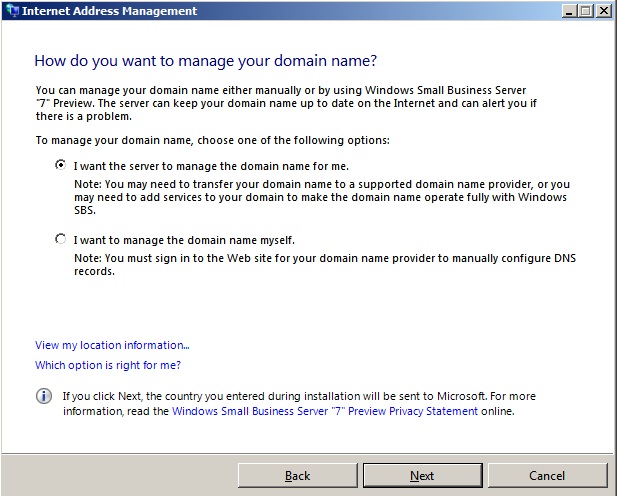
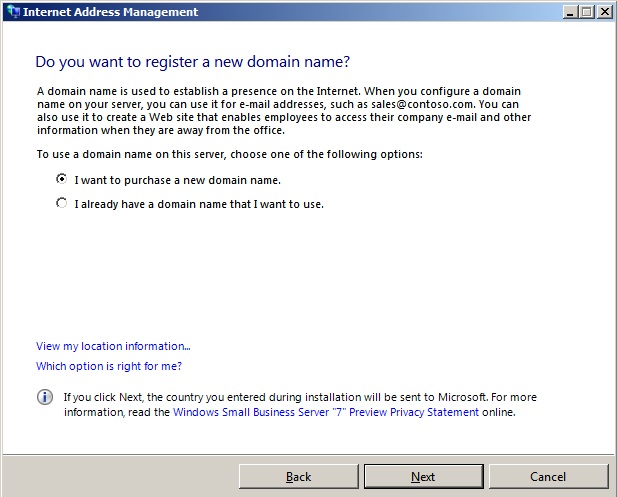 On this screen select the I want to manage the domain name myself and click Next.
 The following screen we need to enter the external domain name we will be using, this will be the domain name used in the hyperlink for Remote Web Workplace, Outlook Web App, ActiveSync and will be used to create your email address.
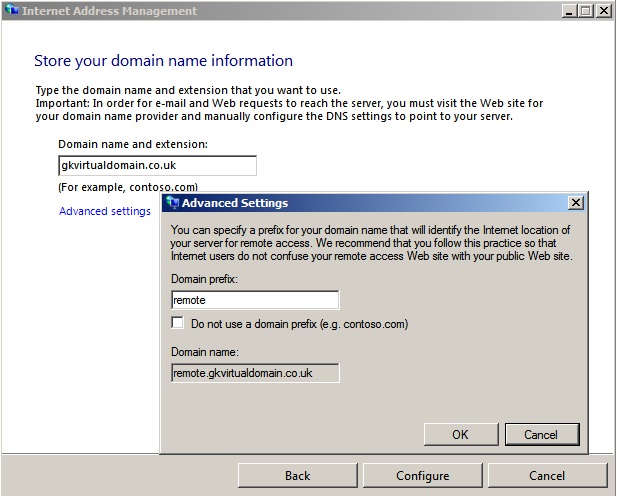 Clicking the Advanced Settings link will allow us to reconfigure the name that appears in the self-signed SSL certificate from remote.domainname.com to something else. If you have mail.domainname.com or owa.domainname.com setup currently then this is where you would enter this information.
Once done click the configure button and the wizard will make the necessary changes. Once completed we want to see the summary screen as below. We are looking for 3 green ticks to say it has been successful.

Step 8. Migrate Exchange Mailboxes and Settings
The next step of the Migration process is to migrate the Exchange Mailboxes and Public Folders. When we launch the wizard for this task we see the following screen.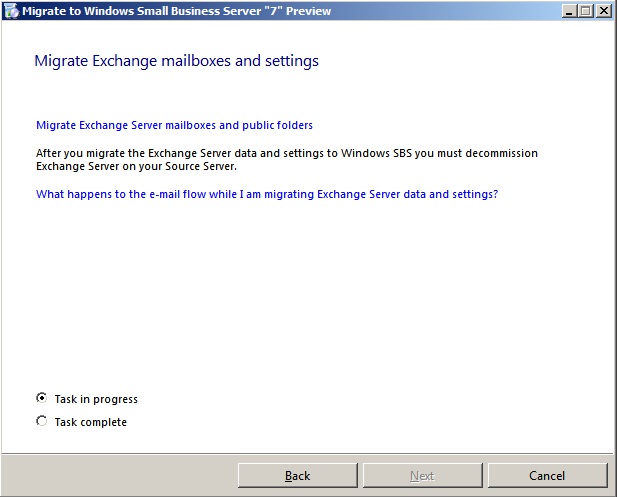 Clicking the hyperlink (at time of writing) takes you to the technet article for Migrating Mailboxes. To do this, we need to delve in to the Exchange Management Console. Click Start > All Programs > Microsoft Exchange Server 2010 and select Exchange Management Console.
Once the console has launched, navigate to Recipient Configuration > Mailbox. Here we should see all our mailboxes listed. All the mailboxes that appear as Legacy Mailbox are currently located on the SBS2003 servers mailstore.
 You can either batch select the mailboxes using SHIFT or CTRL or do each mailbox one by one. Once you have selected the mailboxes to move, from the Action Pane on the right hand side select New Local Move Request. This will start the move mailbox wizard.
 From the first screen click the browse button to select the Mailbox Store on the new SBS2011 Server. Once you have done this click Next.
 For this screen, leave it at defaults for the first run. If you find that mailboxes fail to move due to corrupt items you may have to increase the value here to allow those corrupt items to be skipped and for the mailbox to move successfully.
 The screen above is simply a summary of what task you will be performing, clicking the New button will start the mailbox moves.
Once complete, we are looking for the following screen, all green ticks.
 If you are moving the mailboxes in batches then repeat this task until all mailboxes have been moved to the SBS2011 server.
The next stage is to migrate the Public Folders. To do this, complete the following steps on the SBS 2003 Server:
Click Start > All Programs > Microsoft Exchange Server > System Manager
Navigate to Administrative Groups > First Administrative Group > Servers > Servername > First Storage Group
Right click on the Public Folder Store and select Move All Replicas. The only option that should appear in the list is your Exchange 2010 server. Click OK.
Now that we have moved the data to the SBS2011 server it’s best to leave the Exchange Settings as is for a day or so to a) make sure all the data is moved before we perform any other Exchange related tasks. b) allow all the outlook clients to update automatically with the new server settings. We can now continue with the rest of the migration.
Step 9. Remove Legacy Group Policies and Logon Settings
The next step is to remove any Legacy Group Policies and Logon Configurations that are incompatible with SBS2011. The recommendation here is that any logon scripts in use should be migrated to Group Policies and/or Group Policy preferences. However in my experience it doesn't cause any problems if this is not done.Further information on these processes can be found here:
Remove old logon scripts for Windows SBS migration: http://technet.microsoft.com/en-us/library/cc527605(WS.10).aspx
Remove old Active Directory Group Policy objects for Windows SBS 2008 migration: http://technet.microsoft.com/en-us/library/cc527585(WS.10).aspx
Step 10. Migrate users' Shared Data
This is another task where you need to perform the configuration manually. The steps required can be found here: http://technet.microsoft.com/en-us/library/cc527517(WS.10).aspxOnce you have the shares configured a simple backup of the SBS2003 server and restore to the 2011 server will restore all data with associated permissions.
Alternatively you could use robocopy which is part of the Windows 2003 Resource Kit which can be downloaded from: http://www.microsoft.com/downloads/en/details.aspx?familyid=9d467a69-57ff-4ae7-96ee-b18c4790cffd&displaylang=en
There is also command line reference for robocopy here: http://technet.microsoft.com/en-us/library/cc733145(WS.10).aspx
Step 11. Migrate Fax Data
Launching the wizard will display the following screen.
 Clicking the hyperlink Click to start Migrating your fax data this will move the data to the new server. At this stage if there is no fax services installed/configured on the SBS2003 server you will receive the error displayed below.
 You will receive this error if you haven't installed the Fax role on to Windows Server. This is an optional step and should only be installed if you will be using fax services.
Step 12. Migrate Users and Groups
As part of joining the SBS2011 server to the domain which contains SBS2003 and making it a Domain Controller it has already got a copy of the Active Directory and all the users and groups.However, they will not appear in the SBS Console, this is normal and can be resolved following the instructions here.
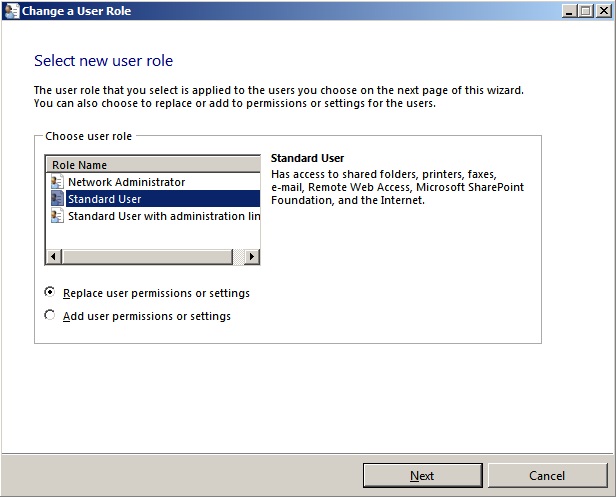
To allow the users to be seen a new role needs to be applied. To do this on the first screen the wizard shows a hyperlink to Run the change user role wizard as illustrated below.
 Click this link, to start the wizard. From the list displayed select the role you wish to assign to these users.
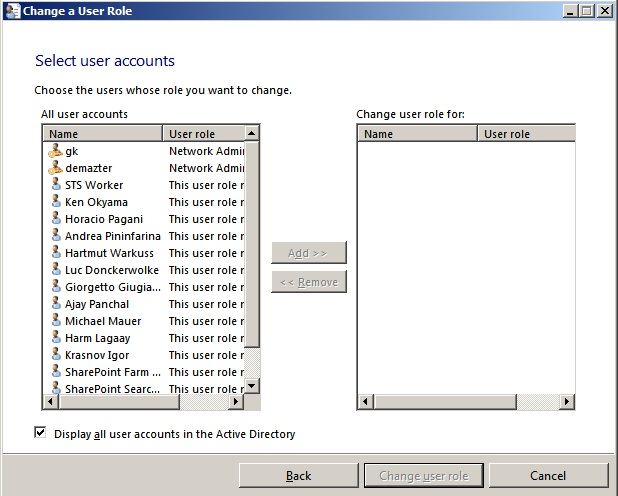
 On the following screen put a check in the box for Display all user accounts in the Active Directory as illustrated below. This will display all of the users. Highlight your existing user then click the Add button to move them to the right hand side.
 Click the change user role button. We are looking for a screen similar to the one below with lots of green ticks to confirm the roles have changed.

Step 13 - Uninstall Exchange 2003 from Small Business Server 2003
Hopefully you are arriving at this step a day or two after you have migrated all the mailboxes, if not then I would recommend you leave it for a day or two just to allow all client computers to automatically update the Exchange server setting in outlook. If you uninstall Exchange 2003 from the Small Business Server and this hasn’t happened then the clients will have to be changed manually.To perform this task we will need Small Business Server 2003 CD 2, which will be asked for during the uninstallation. Before we can do this though, there are a few steps we need to perform otherwise we will not be able to uninstall it.
If you use Recipient Policies that are Manage Mailbox policies, then these will need to be removed. Likewise, if you have Recipient Policies that are used for both e-mail address definition and mailbox management, the settings defined under Mailbox Manager Settings will need to be removed. You DO NOT need to remove your e-mail address policies.
The Recipient Update Service is not used in Exchange 2010 and is therefore not required, so it can be removed. To do this you will need to use ADSI Edit. This can be done by using the following procedure:
click Start > Run > MMC > Click OK
Select File then Add/Remove Snap-in
Click Add and select ADSI Edit and click Add, then close and OK
Right click on the ADSI Edit and select 'Connect to'. From the drop down under 'Select a well known Naming Context', select Configuration and click OK
Expand Configuration > Services > Microsoft Exchange > Organisation Name > Address List Container > Recipient Update Services
Right click on Recipient Update Service (Enterprise Configuration) and select Delete. There may also be a Recipient Update Service (ORGNAME) this also needs to be deleted
Only delete the Recipient Update Service entries under the container; DO NOT delete the container itself or any other entries
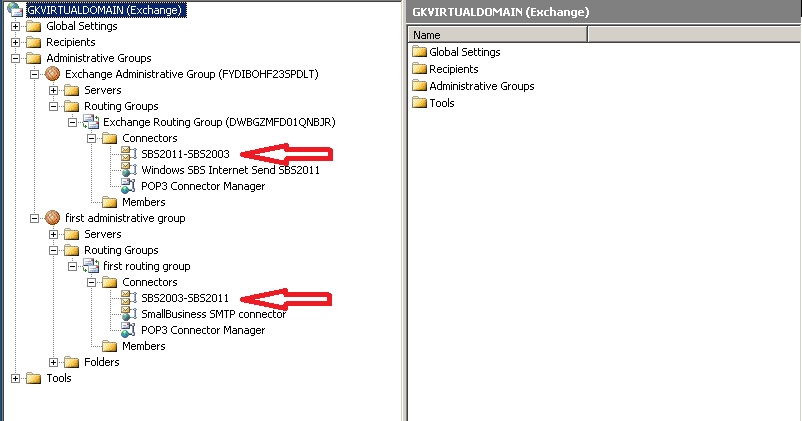
The final step in preparation for uninstalling Exchange Server 2003 is to delete the routing group connectors that would have been created as part of the installation. I have highlighted them in the image below. Simply right click on each connector and select delete.
We are now ready to uninstall Exchange 2003. To do this, navigate to Start > Control Panel > Add or Remove Programs. From the list of installed applications, highlight Windows Small Business Server 2003 and click Change/Remove.
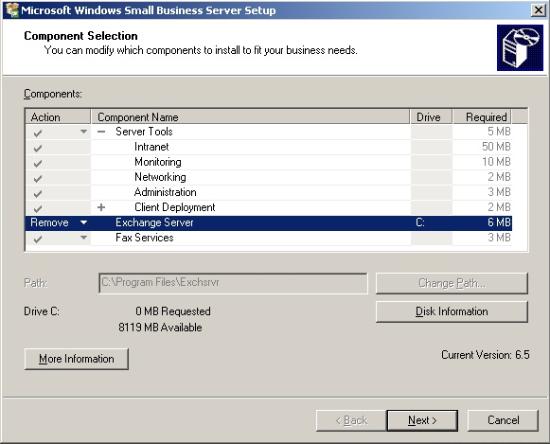
Click next on the Welcome screen, and next on the screen that follows. Once the component screen opens pull down the drop down next to Exchange Server and select remove, as shown below. Then click next and next again.
Step 14. Check Transfer of the 5 FSMO roles to SBS2011
All of the 5 FSMO roles should already have been transferred to the SBS2011 as part of the installation process but it's always worth a check. The steps below will give instructions on how to do this if required.
Caution needs to be taken when performing this next step. I would advise that ALL of the previous steps need to be completed before this is done as Small Business Server MUST hold all 5 FSMO roles.
Once you are ready, the roles can be transferred as follows. Working on the Windows 2008 server do the following:
Click Start > Administrative Tools > Active Directory Users and Computers
Right click on the domain name and select Operations Masters. You will see the screen below.
On each tab (RID, PDC & Infrastructure) click the change button.
Accept the confirmation that you want each role to be transferred.
That is 3 of the 5 roles transferred. To do the next one, which is the Domain Naming Master we need to do the following:
Click Start > Administrative Tools > Active Directory Domains and Trusts.
Right click where it says Active Directory Domains and Trusts and select Operations Master.
Once again click the Change button and say yes to the notification dialog.
4 down with 1 to go. To move the Schema Master role we need to do the following:
Click Start > Run and type regsvr32 schmmgmt.dll
Click OK to the confirmation
Click Start > Run and type MMC and click OK
Select File > Add/Remove Snap-in from the console
From the list select Active Directory Schema, click Add
Click Close and OK.
Right click on Active Directory Schema and select Change Active Directory Domain Controller
Choose the Windows 2008 Server from the list and click OK
Click OK on the warning Dialog box.
Right click on Active Directory Schema and select Operations Master
Click the Change button and say yes to the notification dialog
That’s all the FSMO roles transferred from the Small Business 2003 Server. The next and final step is to demote the server from being a Domain Controller.
Step 15. DCPROMO SBS 2003 server so it is no longer a domain controller and remove from network
This is the final step of the migration process. If you have made it this far, well done! This is the easy bit!At this point it is worth double checking that both the SBS2003 and SBS2011 server are both configured to use the SBS2011 server for DNS in the TCP/IP properties of the NIC. The only DNS entry should be the IP address of the SBS2011 server.
The first thing we need to do is make sure the SBS2003 is no longer a Global Catalog Server. Click on Start > Administrative Tools > Active Directory Sites and Services. Locate the Small Business Server as shown in the screen shot below.
Right click on NTDS settings located under the Small Business Server and select properties. Remove the check from the Global Catalog check box and click OK. Close Active Directory Sites and Services snap-in.
The final step is to run DCPROMO. To do this, do the following:
Click Start > Run and type DCPROMO and click OK
Click next on the Welcome screen
DO NOT check the box that says “This server is the last domain controller in the domain” and Click next
Enter a new administrator password for the local administrator user and click next
The server will then remove Active Directory Services from the SBS2003 server and it will no longer be a Domain Controller.
Once this has finished, allow the server to restart, login and then shut it down. You have now completed the migration.
The only additional step would be the Trusted Certificate Wizard. This is not a requirement to make everything work it just makes the annoying certificate messages go away on external clients and mobile phones. You can get a certificate that will satisfy this requirement from http://www.exchangecertificates.com
If you are still with me, well done! There are a few sections of additional reading below if you would like to know some more detail about some of the processes we have just completed. There is an excellent article from EE Expert tigermatt around the purpose of the FSMO roles which you will find under the further reading section.
Further Reading
Move/Migrate Sharepoint Services: http://technet.microsoft.cMove last legacy Exchange Server: http://technet.microsoft.c
Demystifying the Active Directory FSMO Roles by tigermatt: http://www.experts-exchang
Have a question about something in this article? You can receive help directly from the article author. Sign up for a free trial to get started.
Comments (43)
Commented:
Author
Commented:The process is virtually identical.
Commented:
I started to follow this article from Migrating to SBS 2011 which - per your comment on this EE article you said it was identical to migrating to SBS 2008:
The issue I have is: When running the 'source tool' it does not say anything about 'Preparing Exchange' as your screenshot would suggest. Is that something that I should be concerned about??
Commented:
Does the procedure is same for SBS 2003 t0 SBS 2011 Essentials?
Commented:
Do you have guides for the following?
Migrating from SBS2003 32 bit to Server 2008 R2 standard (not SBS) where exchange is not being used on the sbs2003 box and not planned for Server 2008 R2?
Migrating from SBS2003 32 bit to Server 2012 R2 Essentials where exchange is not being used on the sbs2003 box and not planned for Server 2008 R2?
Migrating from SBS2003 32 bit to Server 2012 R2 Foundation where exchange is not being used on the sbs2003 box and not planned for Server 2008 R2?
View More