

Browse All Articles > Migrating Users from Windows 2003 to Windows 2008 using ADMT 3.1
Hi guys,
I’m going to talk today about the ADMT 3.1 and the complete process of migrating users accounts and passwords supported with snapshots. Active Directory Migration tool “ADMT 3.1” is the latest version that can be run on Windows 2008.
This task will demonstrate with snap shots the process of setting up the ADMT, configuring user’s migrations, setting password export server on the source domain, migrating users’ passwords and SID history.
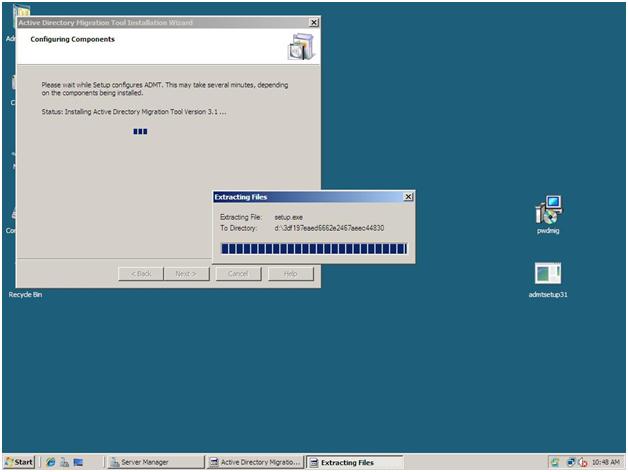
First step: installing ADMT 3.1 on Windows 2008 Domain Controller
![1-installation]()
Installing ADMT
ADMT installation file can be downloaded from
here:
Active Directory Migration Tool version 3.1
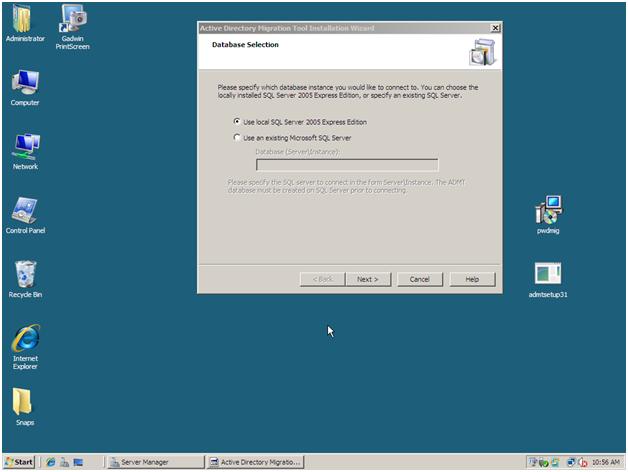
During installation, the installation Wizard will ask about the database to be used by ADMT, the wizard can use existing SQL 2005 instance or it can install a new instance of SQL 2005 Express, in our case we choose to install a new SQL 2005 instance.
![2-sql setup]() Then, the wizard will prompt us if we need to import data from any previous ADMT database, since this is a new installation we choose not to import any data
Then, the wizard will prompt us if we need to import data from any previous ADMT database, since this is a new installation we choose not to import any data
![3-import previous settings]() Importing previous ADMT data.
Importing previous ADMT data.
Then the installation Wizard completes successfully
![4-finish installation]() Second Step: Installing Password Export Server
Second Step: Installing Password Export Server
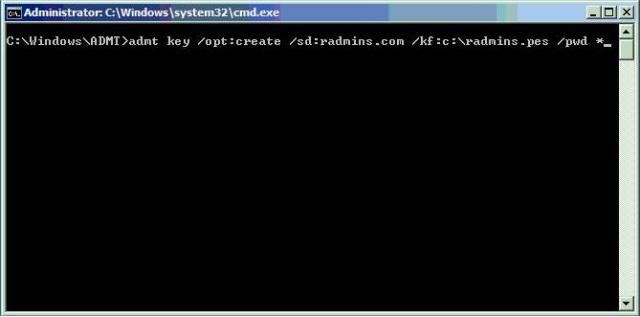
In order to be able to export the users' passwords, we need to install the password export server.
The password export server will need a password encryption file to secure password migration, to create this password encryption file we use the ADMT utility in the command line to generate the file as follows:
1-We navigate to the location of the installation of the ADMT, in our case it is C:\Windows\ADMT
2-We issue the following command
3-The utility will then ask you to provide the password and validate it.
![5- admt key generation_0.preview]() After creating the encryption file we move it the source domain controller where we are going to install and use the password export server as in the following steps
After creating the encryption file we move it the source domain controller where we are going to install and use the password export server as in the following steps
1-Start the installation wizard
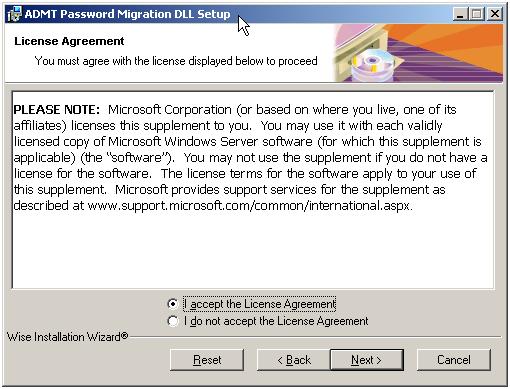
![6-installing PES]() 2- Accept the license agreement
2- Accept the license agreement
![7-accept the license]() 3- Choose the password encryption key file that we created in the previous steps
3- Choose the password encryption key file that we created in the previous steps
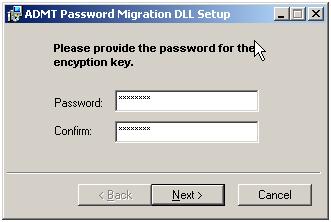
4- Insert the password that we used to encrypt the password encryption file
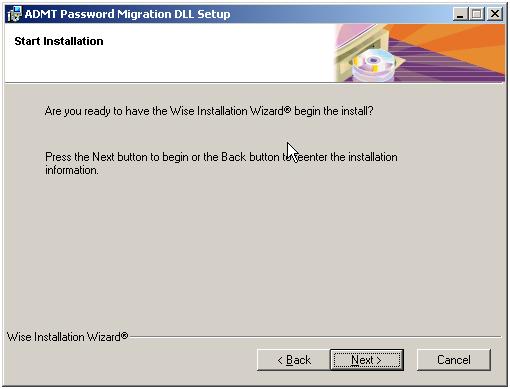
![9-password prompt]() 5- Start installing the Password Export Server
5- Start installing the Password Export Server
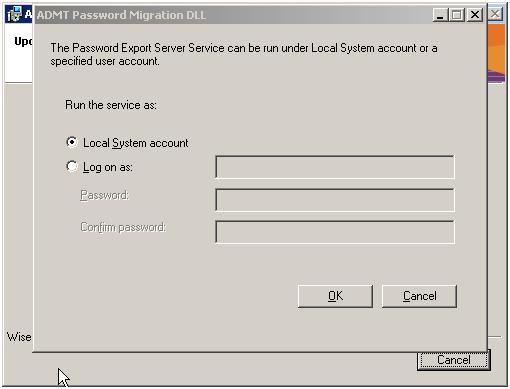
![10-start installation]() Choose the service account that the PES server will run under , this account should be administrator on the destination domain, we chose the administrator in the source domain and made it a member of the administrators group in the Windows 2008 domain.
Choose the service account that the PES server will run under , this account should be administrator on the destination domain, we chose the administrator in the source domain and made it a member of the administrators group in the Windows 2008 domain.
![11-pes installation]() Up to this stage, the installation is finished, the wizard will require the source server to be restarted.
Up to this stage, the installation is finished, the wizard will require the source server to be restarted.
After restarting the server, the PES server has to be started manually.
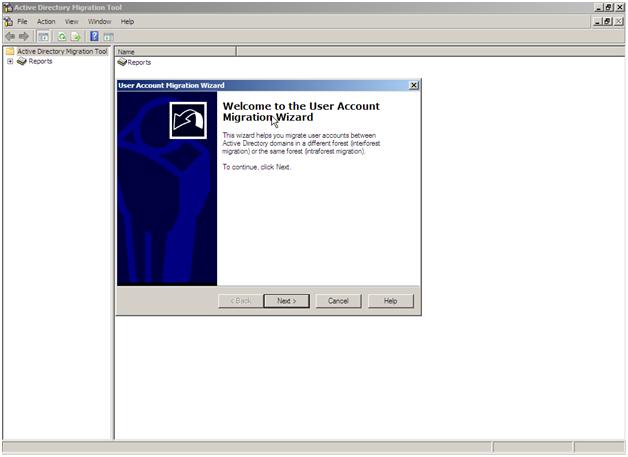
Running the ADMT Migration wizard
To start the migration wizard, we go to the ADMT console on the destination domain controller, “Windows 2008 DC” and
start the user’s migration Wizard
![12-start admt wizard]() Start ADMT Users Migration
Start ADMT Users Migration
Choose next to the welcome screen
![13-start admt wizard]() Start Migration
Start Migration
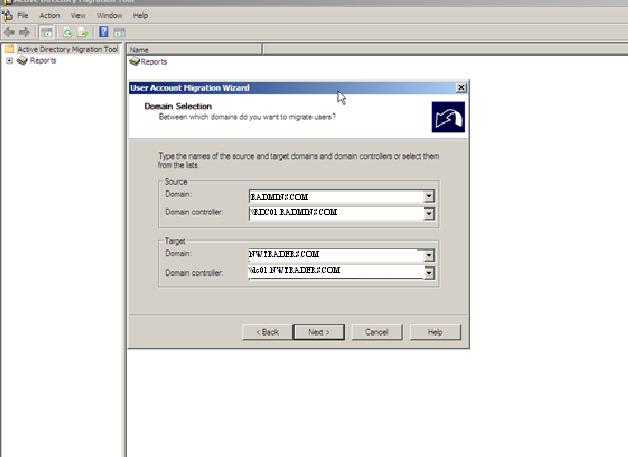
Choose the source Domain and domain controller, and the destination domain and domain controller. In our case the source domain is radmins.com and the source domain controller is RDC01radmins.com, the destination domain is nwtraders.com and the destination domain controller is dc01.nwtraders.com
![14-Source-Destination DCs]() Then we choose to select the users from the domain directly and not from a file
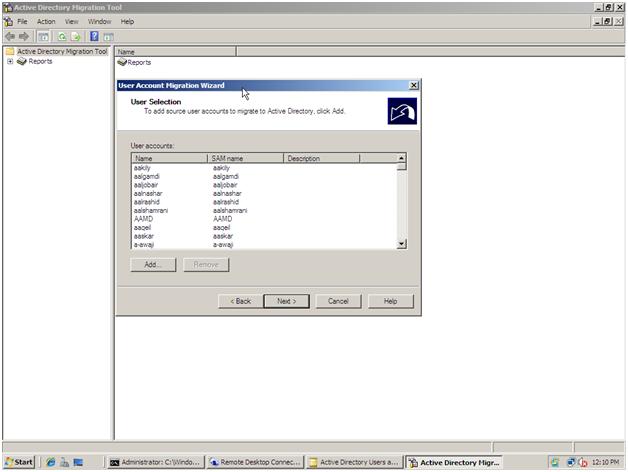
Then we choose to select the users from the domain directly and not from a file
![15-select users from doamin]()
![16-select users from doamin]() Selecting Users to Be migrated
Selecting Users to Be migrated
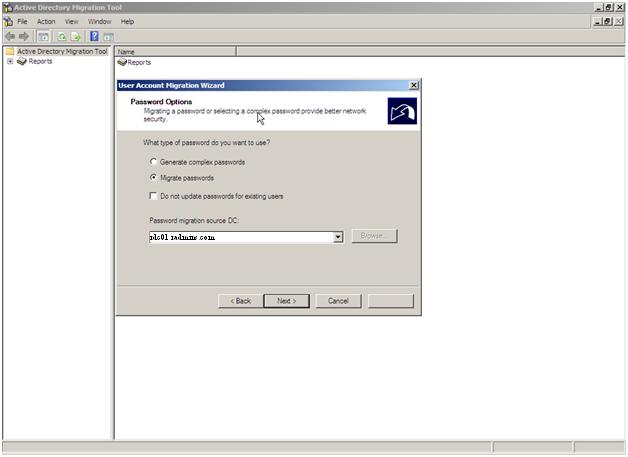
After selecting the user accounts to be migrated, we choose to migrate the passwords of the users as well and choose the password export server on that we installed on the source domain controller.
![17-password migration]()
Password Migration
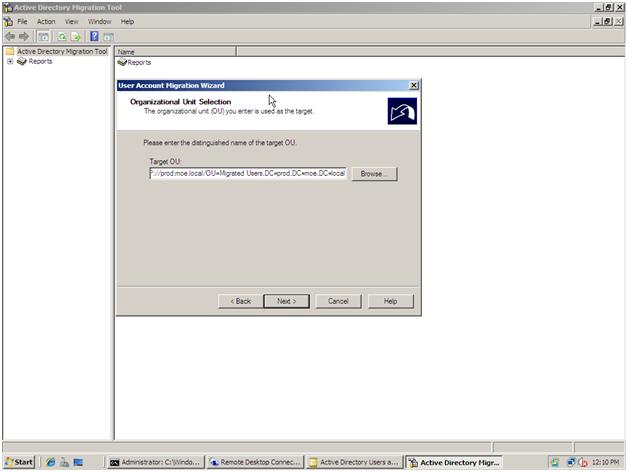
Then we choose the target OU to which we will migrate the users to.
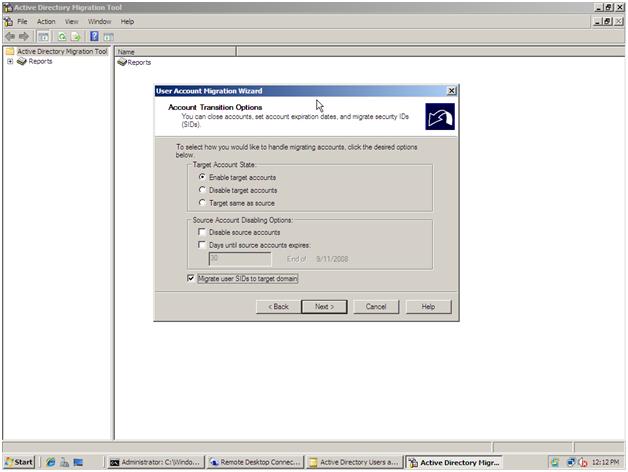
![18-destination ou]() Then we choose the state of the migrated users, we can select that the users will be enabled, disabled, or the same state of the source domain, also we can select to migrate the source SID of the users, this will allow users to access the resources that they used to access in the source domain.
Then we choose the state of the migrated users, we can select that the users will be enabled, disabled, or the same state of the source domain, also we can select to migrate the source SID of the users, this will allow users to access the resources that they used to access in the source domain.
![19]()
Migrated users state and SID migration
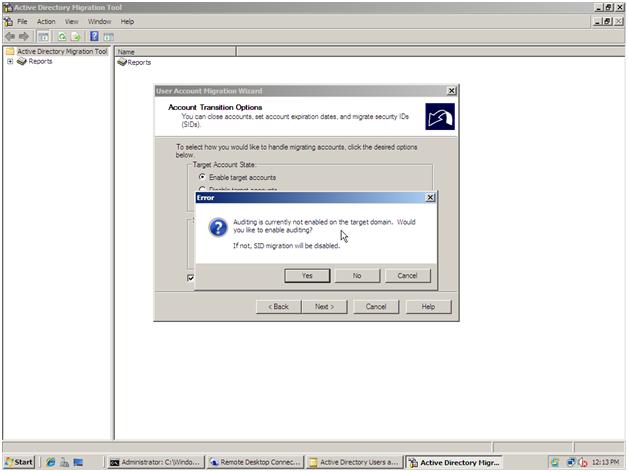
When choosing to migrate the users SIDs, the wizard will prompt to enable auditing and creating a group necessary for migration of users SIDs, by selecting “yes” the wizard will enable these settings on the source domain controller automatically ad we can proceed.
![20]()
Enabling Auditing
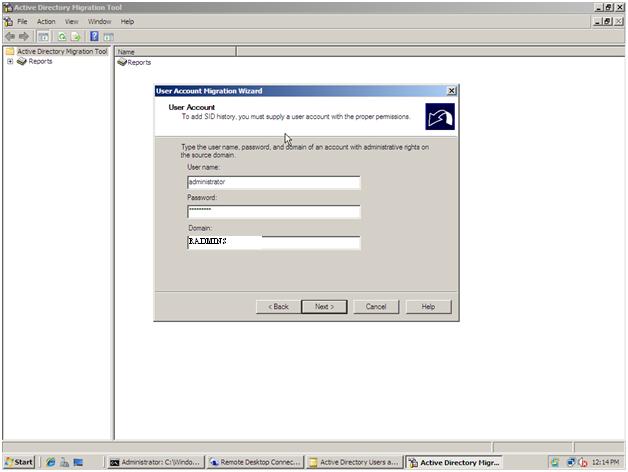
The wizard then will prompt for a user account with proper privilege to add SID history
![21]() Administrative Account
Administrative Account
The wizard then will prompt for options like migrating users roaming profiles, update user’s rights, migrating associated groups, and fix users group memberships.
![22]() Migration Options
Migration Options
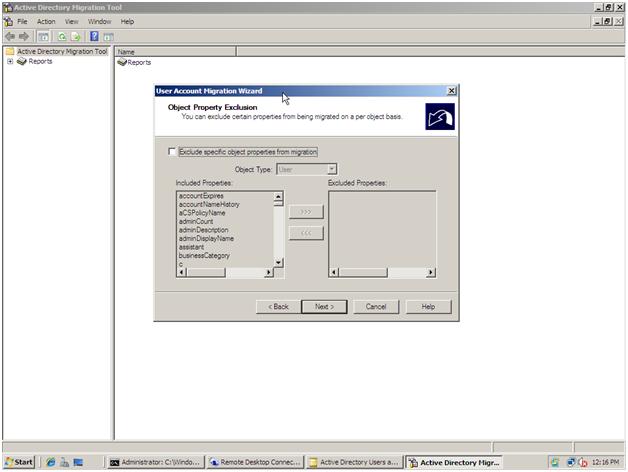
Then the wizard gives us an option to exclude some users from migrations.
![23]() Users Exclusion
Users Exclusion
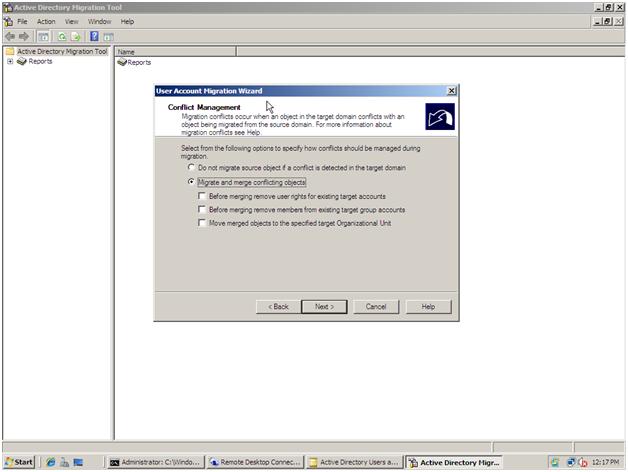
Then we can choose how to handle conflicts when they occur.
![24]() Dealing with users conflict
Dealing with users conflict
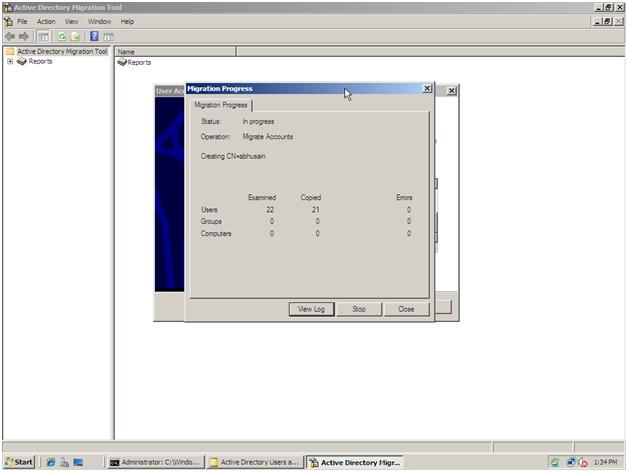
And finally the migration wizard will start migrating users.
![25]()
I’m going to talk today about the ADMT 3.1 and the complete process of migrating users accounts and passwords supported with snapshots. Active Directory Migration tool “ADMT 3.1” is the latest version that can be run on Windows 2008.
This task will demonstrate with snap shots the process of setting up the ADMT, configuring user’s migrations, setting password export server on the source domain, migrating users’ passwords and SID history.
First step: installing ADMT 3.1 on Windows 2008 Domain Controller
Installing ADMT
ADMT installation file can be downloaded from
here:
Active Directory Migration Tool version 3.1
During installation, the installation Wizard will ask about the database to be used by ADMT, the wizard can use existing SQL 2005 instance or it can install a new instance of SQL 2005 Express, in our case we choose to install a new SQL 2005 instance.
 Then, the wizard will prompt us if we need to import data from any previous ADMT database, since this is a new installation we choose not to import any data
 Importing previous ADMT data.
Then the installation Wizard completes successfully
 Second Step: Installing Password Export Server
In order to be able to export the users' passwords, we need to install the password export server.
The password export server will need a password encryption file to secure password migration, to create this password encryption file we use the ADMT utility in the command line to generate the file as follows:
1-We navigate to the location of the installation of the ADMT, in our case it is C:\Windows\ADMT
2-We issue the following command
admt key /opt:create /sd:”Source_Domain” /kf:c:\Domain.pes /PWD *3-The utility will then ask you to provide the password and validate it.
 After creating the encryption file we move it the source domain controller where we are going to install and use the password export server as in the following steps
1-Start the installation wizard
 2- Accept the license agreement
 3- Choose the password encryption key file that we created in the previous steps
4- Insert the password that we used to encrypt the password encryption file
 5- Start installing the Password Export Server
 Choose the service account that the PES server will run under , this account should be administrator on the destination domain, we chose the administrator in the source domain and made it a member of the administrators group in the Windows 2008 domain.
 Up to this stage, the installation is finished, the wizard will require the source server to be restarted.
After restarting the server, the PES server has to be started manually.
Running the ADMT Migration wizard
To start the migration wizard, we go to the ADMT console on the destination domain controller, “Windows 2008 DC” and
start the user’s migration Wizard
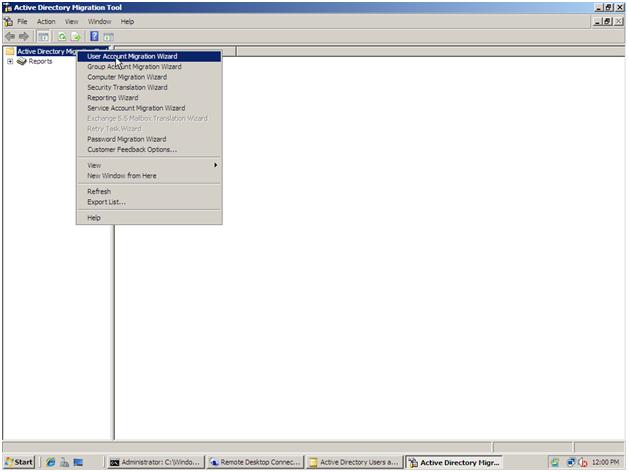 Start ADMT Users Migration
Choose next to the welcome screen
 Start Migration
Choose the source Domain and domain controller, and the destination domain and domain controller. In our case the source domain is radmins.com and the source domain controller is RDC01radmins.com, the destination domain is nwtraders.com and the destination domain controller is dc01.nwtraders.com
 Then we choose to select the users from the domain directly and not from a file

 Selecting Users to Be migrated
After selecting the user accounts to be migrated, we choose to migrate the passwords of the users as well and choose the password export server on that we installed on the source domain controller.
Password Migration
Then we choose the target OU to which we will migrate the users to.
 Then we choose the state of the migrated users, we can select that the users will be enabled, disabled, or the same state of the source domain, also we can select to migrate the source SID of the users, this will allow users to access the resources that they used to access in the source domain.
Migrated users state and SID migration
When choosing to migrate the users SIDs, the wizard will prompt to enable auditing and creating a group necessary for migration of users SIDs, by selecting “yes” the wizard will enable these settings on the source domain controller automatically ad we can proceed.
Enabling Auditing
The wizard then will prompt for a user account with proper privilege to add SID history
 Administrative Account
The wizard then will prompt for options like migrating users roaming profiles, update user’s rights, migrating associated groups, and fix users group memberships.
 Migration Options
Then the wizard gives us an option to exclude some users from migrations.
 Users Exclusion
Then we can choose how to handle conflicts when they occur.
 Dealing with users conflict
And finally the migration wizard will start migrating users.
Have a question about something in this article? You can receive help directly from the article author. Sign up for a free trial to get started.
Comments (3)
Commented:
Refreshed my learning of using ADMT v2 and v3..
Commented:
Commented: