Prevent Losing Contacts in Outlook


IT Professional - Helping others to help themselves. https://andrewleniart.com & https://www.computerhelpzone.com.au/testimonial/
Published:
Browse All Articles > Prevent Losing Contacts in Outlook
While repairing a troublesome IMAP connection with Office 365, a list of over 500 Outlook Contacts mysteriously disappeared. Learn how to prevent and safeguard yourself against that happening to you by following the steps in this article.
Introduction
A recent question posed by a long-time Experts Exchange member asking for help to fix a problem of not being able to access the Advanced settings of his IMAP OST file led to suggested repairs that resulted in him losing all of his Outlook contacts .
In this article, I explain what was done to restore those contacts, along with some suggestions you should take note of so that you're never faced with the same disaster.
How were his contacts lost?
Unfortunately, that question can't be answered with any sort of certainty yet.
Many articles on the web about this problem point to recent Windows 10 updates being the cause. For instance, the Stellar Website states:
Microsoft releases regular updates of the Windows operating systems to enhance new features and to fix security patches. Windows 10 is increasingly becoming popular among users, upgrading to Windows 10 is easy, however, at times upgrade can trigger major or minor data loss.
Missing Outlook contacts is one major issue for MS Outlook users who have upgraded to Windows 10.
Another example: According to the Kernal Data Recovery Website :
Whenever a new system version/upgrade is available, it brings the latest security patches, bug fixes and possibly new feature additions. But for some users, upgrading to the new version of the Operating system can become a mess. It can lead to data loss and can also result in data corruption.
From many user search queries, it was found that most of them were facing Outlook Contacts missing issue after the system upgrades to Windows 10.
Yet, I too run the latest build of Windows 10 with all available feature updates installed, and nothing untoward happened when I tried the same repairs done on the above member's machine using one of my up to date testing Virtual Machines (VM) with the full suite of Microsoft 365 installed. The difference, however, was that I used a PST file to go through the repair steps using Microsoft's ScanPst tool.
However, when I did the same tests and ran ScanPst on an IMAP created OST file, I could reproduce the error and my contacts disappeared. Frustratingly, when I restored everything back and ran ScanPst over the OST file yet again, I didn't lose my contacts the second time, so I can't blame the ScanPst tool just yet until a lot of other variables are tested over the next few weeks to conclusively nail down the cause.
I intend to update this article once I have determined the cause of losing Outlook's contacts after conducting many more troubleshooting tests, including eliminating variables such as enabled third party software, various Windows 10 settings, and so on.
So, for now, the best thing to do is safeguard your Outlook information by backing it up. There are many methods to do that; however, the following is my own preferred method, and I'll explain it with step-by-step instructions below.
Prevention & Resolution
The best way to ensure you can recover if this ever happens to you is to make a backup of your data before doing any maintenance or rectification works on Outlook, regardless if you are using a POP or IMAP configuration. Fortunately, a backup was available to enable the easy recovery of the EE members 500+ lost contacts.
Also, don't rely on your Backup Software to protect you in this respect when using IMAP unless you are sure it backs up what's needed.
The user that struck this problem was using Carbonite Backup and Recovery software and had it set to continuously back up all changes made to his computer to their cloud server, as was recommended by Carbonite support.
However, when I tried to retrieve his contacts from his cloud-stored backups, no backed up OST or PST files were to be found. After a bit of investigation, I discovered that OST files, by default, are not included in Carbonite Backups, so you should be aware of that if you too use Carbonite as your backup solution.
Backup your Outlook Data File(s)
Note: The following is my preferred method of backing up - other methods are available and can be just as effective. You should always back up your Outlook data before doing any maintenance or attempting any type of repair, such as using the Microsoft supplied S canPst repair tool.
1. Open Outlook and click File > Open & Export > and then the Import/Export button.

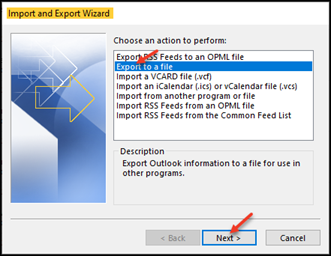
2. On the Import and Export Wizard window, first select Export to a File and then click the Next > button.
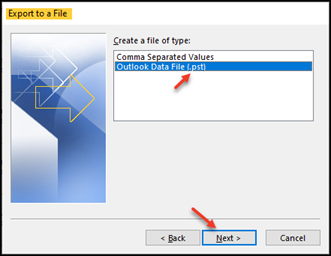
3. The Export to a file window appears, select Outlook Data File (.pst) and click the Next > button.
The Export Outlook Data File window appears. Select your main Outlook data file if you have more than one. Alternatively, select whichever data file you want to back up the information from.
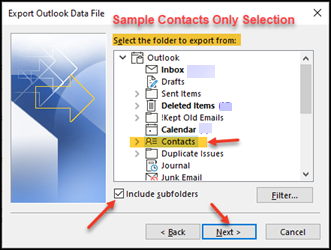
Note: At this next step, you can if you want to only back up the Contacts folder; however, I strongly recommend backing up the entire data file so that you have a copy of all the content in your Outlook PST or OST file. I consider this a best practice because if something were to go wrong in the future with a folder other than just Contacts, you would be in a position to recover any items the data file contained at the time you made your backup.
4. Under Select the folder to export from:
a) Click the top level of the data file you want to backup. In the case below, my main data file is called Outlook - the name of yours may differ.
b) Ensure Include subfolders is ticked
c) Click the Next button

The above step is identical for IMAP data files, with the only difference being that it will have (IMAP) added to the end of its name. E.g., YourEmail@YourDomain.com (IMAP) - See the example below.

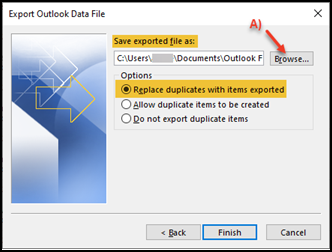
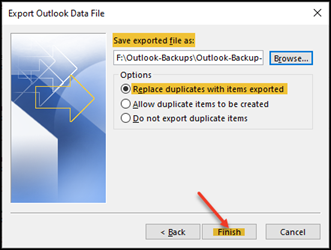
5. After clicking Next, a "Save exported file as:" window will appear.
A) Click the Browse... button and leave "Replace duplicates with items exported" selected.
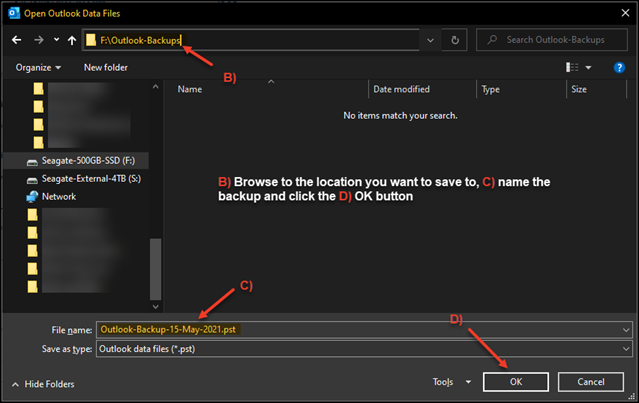
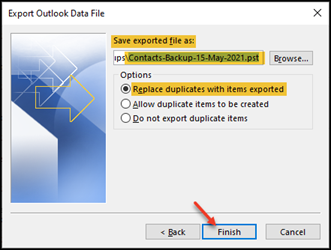
You will be prompted to give your backup a name and a location to save your PST data file. Outlook will select its own data folder by default; however, I suggest keeping the backup on a separate drive if you have one and give the PST a descriptive name such as "Outlook-Backup-15-May-2021.pst" - This becomes handy if you decide to keep more than one full backup in future.
C) Give the Backup an appropriate name
D) Click the OK button
6. Back on the Export Outlook Data File window, click the Finish button to begin the Export (Backup) process.
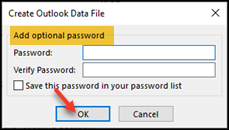
Optional: If you want to protect your backup from unauthorised access, provide a password at the following prompt; else, just click the OK button.

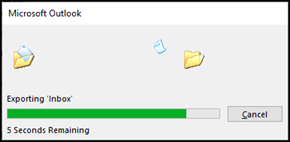
Your pointer will turn into a busy icon  and progress bars will appear showing what is being exported/backed up to the PST file.
and progress bars will appear showing what is being exported/backed up to the PST file.
Once it's finished, you're done. You have just backed up the entire content of the Outlook data file (Emails, Contacts, Calendar Entries, Tasks, the lot) and can restore any part of it if something goes wrong with repairs or changes you make.
Backup Outlook Contacts Only
If you don't want to backup your entire Outlook data file, simply select what you want to back up, hit the Finish button and continue with the remaining steps. It's totally up to you.
Simply replace the above-suggested selection as shown below to create a Contacts backup only.
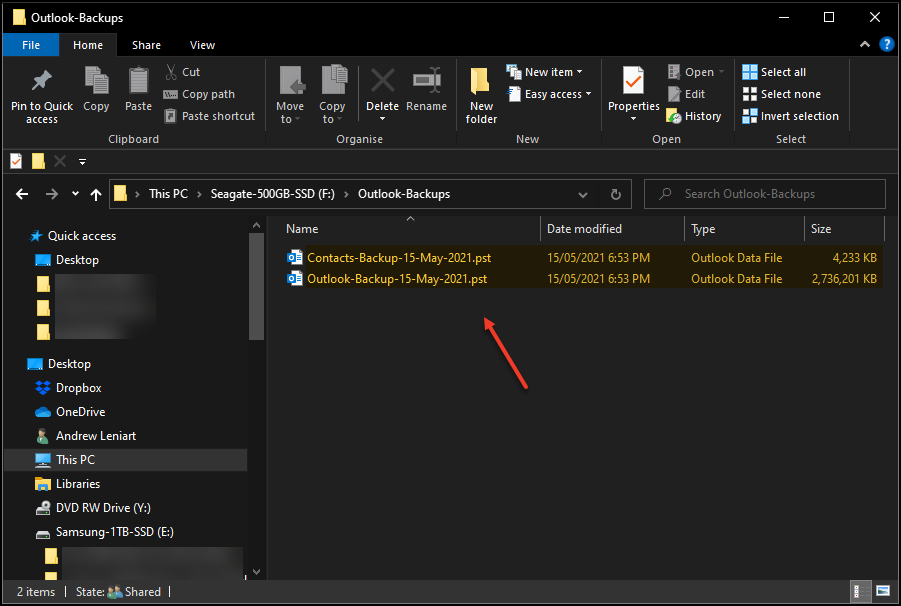
Note: I recommend backing up all Outlook data files you have configured before commencing with any troubleshooting or repairs. It only takes a minute and safeguards all your data. The above two example backup(s) would look like so once completed.
Simply replace the above-suggested selection as shown below to create a Contacts backup only.
Note: I recommend backing up all Outlook data files you have configured before commencing with any troubleshooting or repairs. It only takes a minute and safeguards all your data. The above two example backup(s) would look like so once completed.
Verify the integrity of your backup
Backups are only good if they're reliable, so spend a moment to verify your backup file(s) integrity.
First, we'll verify the full backup made.
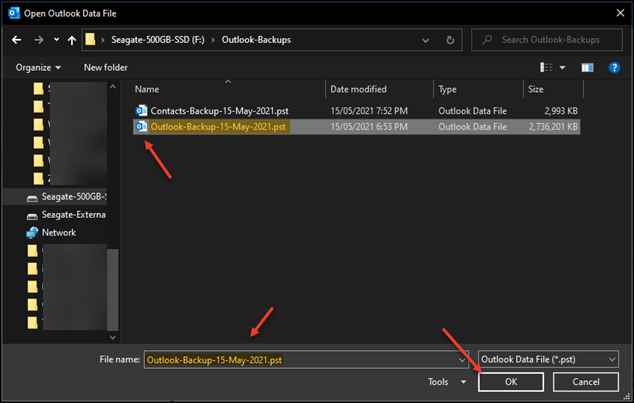
In Outlook, click File > Open & Export > Open Outlook Data File

Select the full backup you made earlier and click the OK button.
An Outlook Data File entry will appear in Outlook's navigation pane. Expand it by clicking the > arrow. You should notice that the opened PST will be an exact duplicate of everything that exists in your main data file.
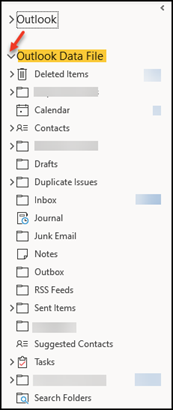
Remove the data file from Outlook by right-clicking Outlook Data File and then selecting Close "Outlook Data File"

If you also made a Contacts Only backup, verify that as well.
And there they all are, safe and sound in case something goes wrong during repairs.
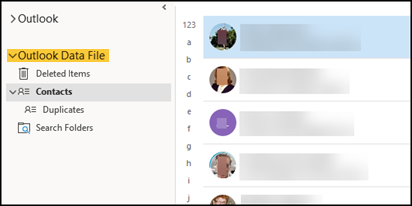
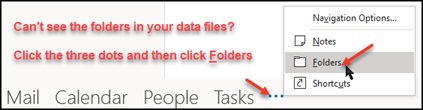
! Tip - If you can't see your folders when you open a saved PST data file, simply click the three dots at the bottom left of the Outlook navigation pane and click on the Folders option.
Many people enjoy the way Outlook autocompletes email addresses they frequently type into the To: field when addressing emails. This convenience can be lost if you need to create a new Outlook profile or do other troubleshooting steps to repair an Outlook problem.
The Auto-Complete information is stored in an nk2 file, but what's confusing is that it's no longer called <name>.nk2 on the hard drive, yet many websites (even Microsoft themselves) are still hosting instructional articles that point to the location where to find .nk2 files.
With current Window 10 and Office 365 builds, you need to look for and backup differently named files. Here's how.
A much easier and effective way to safeguard and restore your Auto-Complete entries is by utilizing an excellent free utility by Nirsoft that I can wholeheartedly recommend.
It's a standalone program so no installation is needed. Just visit this web page and download the file called NK2Edit.zip available from the bottom of the page.
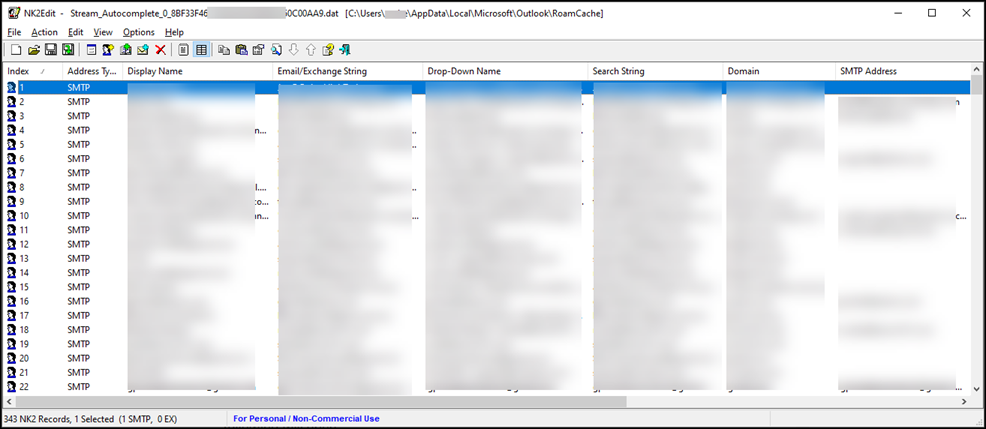
Extract the two files (NK2Edit.exe and NK2Edit.chm) from the zip file to any folder and run the NK2Edit executable. A window that provides a host of information like the following will open.
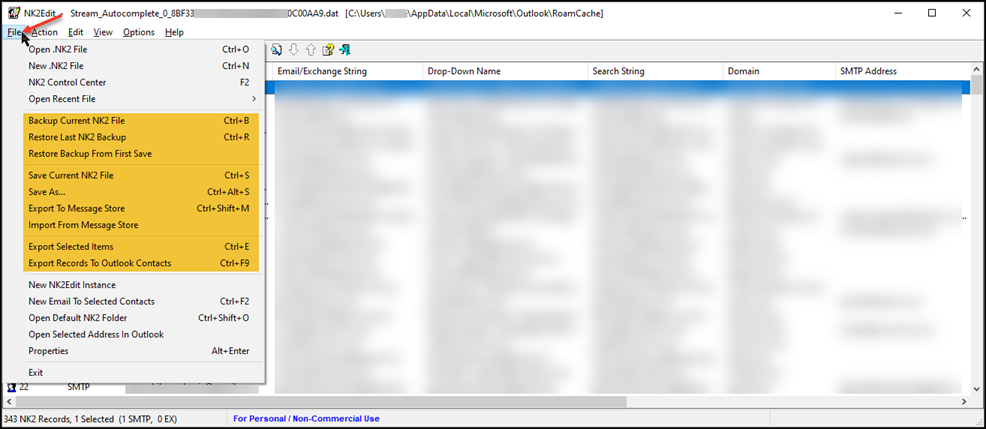
To save and/or restore your Auto-Complete entries, click the File menu item and choose to either Save or Restore as needed. It doesn't get any simpler than that and the tool is totally free for use in non-commercial environments.
Explore the other menu items to see what else you can do and read the help file included with the program. I also encourage you to send NirSoft's author a donation to encourage further development. I've done that myself because I frequently use so many of his free, functional, and time-saving utilities.
As mentioned at the start of this article, many sites are claiming that the problem only exists because of recent Windows 10 updates. But only time and further testing will confirm or deny that assumption.
I hope you found the information in this article informative and helpful. If you have any questions, don't hesitate to ask by either leaving a comment below or by contacting me directly.
Finally, please do take a second to click the Thumbs Up icon below. It really helps me out. Thank you very much.

! Tip - If you can't see your folders when you open a saved PST data file, simply click the three dots at the bottom left of the Outlook navigation pane and click on the Folders option.
Preserving and Restoring Auto-Complete Entries in Outlook
Many people enjoy the way Outlook autocompletes email addresses they frequently type into the To: field when addressing emails. This convenience can be lost if you need to create a new Outlook profile or do other troubleshooting steps to repair an Outlook problem.
The Auto-Complete information is stored in an nk2 file, but what's confusing is that it's no longer called <name>.nk2 on the hard drive, yet many websites (even Microsoft themselves) are still hosting instructional articles that point to the location where to find .nk2 files.
With current Window 10 and Office 365 builds, you need to look for and backup differently named files. Here's how.
1. Using Windows File Explorer, navigate to the following path:
C:\Users\YourUsername\AppData\Local\Microsoft\Outlook\RoamCache
2. Look for the files named Stream_Autocomplete_0_RandomLetters&Numbers.dat. There will likely be more than one, so grab a copy of all of them and save them to a temporary folder on your hard drive. They will look similar to what's shown below.
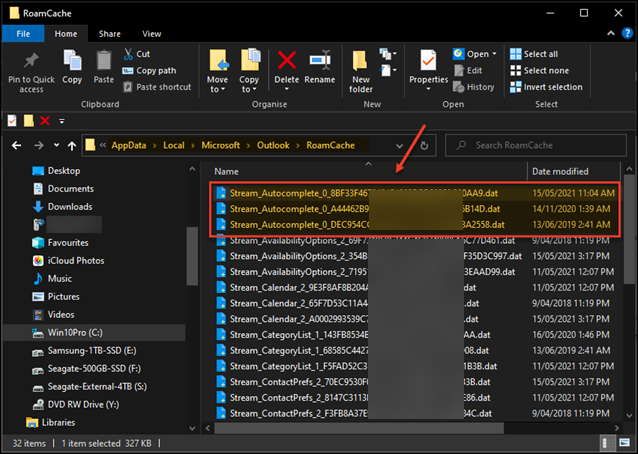
3. Copy those files (the latest dated one is the most important) and save them to a temporary folder on your hard drive to restore later if you need to. If you lose your Auto-Complete abilities in Outlook, you can restore the above files back by renaming the latest dated one to the empty Autocomplete file Outlook creates when it's first opened after repairs.
C:\Users\YourUsername\AppData\Local\Microsoft\Outlook\RoamCache
2. Look for the files named Stream_Autocomplete_0_RandomLetters&Numbers.dat. There will likely be more than one, so grab a copy of all of them and save them to a temporary folder on your hard drive. They will look similar to what's shown below.
3. Copy those files (the latest dated one is the most important) and save them to a temporary folder on your hard drive to restore later if you need to. If you lose your Auto-Complete abilities in Outlook, you can restore the above files back by renaming the latest dated one to the empty Autocomplete file Outlook creates when it's first opened after repairs.
A much better and easier way to do it!
A much easier and effective way to safeguard and restore your Auto-Complete entries is by utilizing an excellent free utility by Nirsoft that I can wholeheartedly recommend.
It's a standalone program so no installation is needed. Just visit this web page and download the file called NK2Edit.zip available from the bottom of the page.
Extract the two files (NK2Edit.exe and NK2Edit.chm) from the zip file to any folder and run the NK2Edit executable. A window that provides a host of information like the following will open.
To save and/or restore your Auto-Complete entries, click the File menu item and choose to either Save or Restore as needed. It doesn't get any simpler than that and the tool is totally free for use in non-commercial environments.
Explore the other menu items to see what else you can do and read the help file included with the program. I also encourage you to send NirSoft's author a donation to encourage further development. I've done that myself because I frequently use so many of his free, functional, and time-saving utilities.
Conclusion
As mentioned at the start of this article, many sites are claiming that the problem only exists because of recent Windows 10 updates. But only time and further testing will confirm or deny that assumption.
I hope you found the information in this article informative and helpful. If you have any questions, don't hesitate to ask by either leaving a comment below or by contacting me directly.
Finally, please do take a second to click the Thumbs Up icon below. It really helps me out. Thank you very much.
©Andrew Leniart 2021
IT Professional | Freelance Journalist
IT Professional - Helping others to help themselves. https://andrewleniart.com & https://www.computerhelpzone.com.au/testimonial/
Have a question about something in this article? You can receive help directly from the article author. Sign up for a free trial to get started.
Comments (4)
Commented:
Thank you for an excellent article that will help whoever encounter this problem. Very useful reference indeed. One question though, Does Carbonite backs up Calendar and contacts? I am not quiet sure when you state .OST file is not backed if includes these 2 entities.
Thank you,
Basem Khawaja
Author
Commented:No, it doesn't and yes, it does include those two entities. I'd ask Carbonite Support what they recommend to ensure those items are backed up in future. It not backing them up is very poor practice, but may be easy to correct if they give you settings to change.
That said, creating an OST backup (export to PST) occasionally as described in the article will protect you for now.
Best, Andrew
Commented:
Author
Commented:Means a lot coming from another Outlook Expert and Office 365 Consultant like you :)